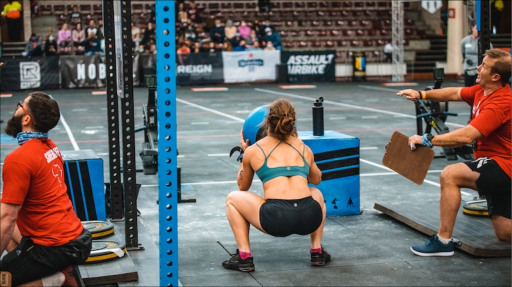
CrossFit's Workout Of The Day

Monday 260518
For time:
10 deadlifts
20 pull-ups
30 wall-ball shots
40 box jumps
1,000-meter row
40 box jumps
30 wall-ball shots
20 pull-ups
10 deadlifts
♀ 185-lb barbell, 20-inch box, and 14-lb medicine ball to a 9-foot target
♂ 275-lb barbell, 24-inch box, and 20-lb medicine ball to a 10-foot target
Post time to comments.
Stimulus and Strategy:
Today’s workout is a chipper that will challenge the entire body, with the lower-body fatigue really stacking up as you move through the workout. Expect the deadlifts to be demanding, but aim to complete them with no more than one break. Try to finish each set of pull-ups in 90 seconds or less.
The wall-ball shots will tax the legs and shoulders, so focus on maintaining larger sets and completing all reps in under 2 minutes. The box jumps may become the most challenging movement, especially after the other elements of the workout. Settle into a consistent, steady pace and aim to complete each set in under 3 minutes.
Row at a hard but controlled pace that still allows for a quick transition into the second set of box jumps. If the row will take longer than 4:30 to complete, consider scaling the distance.
Intermediate option:
For time:
10 deadlifts
15 pull-ups
30 wall-ball shots
40 box jumps
800-meter row
40 box jumps
30 wall-ball shots
15 pull-ups
10 deadlifts
♀ 125-lb barbell, 20-inch box, and 10-lb medicine ball to a 9-foot target
♂ 185-lb barbell, 24-inch box, and 14-lb medicine ball to a 10-foot target
Beginner option:
For time:
10 deadlifts
15 ring rows
20 wall-ball shots
25 box step-ups
500-meter row
25 box step-ups
20 wall-ball shots
15 ring rows
10 deadlifts
♀ 45-lb barbell, 12-inch box, and 6-lb medicine ball to an 8-foot target
♂ 65-lb barbell, 12-inch box, and 10-lb medicine ball to a 9-foot target
Resources:
The Deadlift
The Kipping Pull-Up
The Wall-Ball Shot
The Box Jump
Rowing Technique Tips
The Ring Row
The Box Step-Up
Find a gym near you:
View the CrossFit map

Monday 260504
75-50-25 reps for time of:
Wall-ball shots
AbMat sit-ups
Bike calories*
*Women bike 60-40-20 calories
♀ 14-lb medicine ball to a 9-foot target
♂ 20-lb medicine ball to a 10-foot target
Post time to comments.
Stimulus and Strategy:
Today's workout is a longer one that will challenge your overall endurance and place a significant demand on your legs and trunk. The goal is to complete the workout in under 30 minutes. The wall-ball shot volume is significant; try to maintain consistent sets of at least 15 reps with short rest, especially during the set of 75. Expect the sit-ups to be more challenging than you might think. Work to maintain full range of motion and keep breaks short — reduce the reps as needed. Try to maintain 10-15 calories per minute on the bike. Scale if needed to do so. The first round is about half the workout and should be finished by the 15-minute mark. If you fall out of this time domain, plan to scale subsequent rounds.
Intermediate option:
50-35-15 reps for time of:
Wall-ball shots
AbMat sit-ups
Bike calories*
*Women bike 40-25-10 calories
♀ 10-lb medicine ball to a 9-foot target
♂ 14-lb medicine ball to a 10-foot target
Beginner option:
30-20-10 reps for time of:
Wall-ball shots
AbMat sit-ups
Bike calories*
*Women bike 20-15-10 calories
♀ 6-lb medicine ball to a 9-foot target
♂ 10-lb medicine ball to a 9-foot target
Resources:
The Wall-Ball Shot
The AbMat Sit-Up
Rogue Echo Bike
Find a gym near you:
View the CrossFit map

Friday 260410
Kelly
5 rounds for time of:
400-meter run
30 box jumps
30 wall-ball shots
♀ 14-lb medicine ball to a 9-foot target and a 20-inch box
♂ 20-lb medicine ball to a 10-foot target and a 24-inch box
Compare to 240330.
Post time to comments.
Stimulus and Strategy:
Today's workout is the CrossFit benchmark Kelly. Kelly is a long grind, but the goal is to keep moving throughout. This workout rewards consistency. If you need to take a few extra breaths, do so during your transition to the next movement. Maintain large chunks of box jumps and wall-ball shots. Try to keep moving on the box jumps and perform the wall-ball shots in 2 sets or fewer in each round. You can recover a bit on the run, but don't take longer than 2:15. You can afford to run a little slower if it means faster and bigger sets on the other movements. If scaled correctly, a single round should take no more than 6 minutes to complete.
Intermediate option:
4 rounds for time of:
400-meter run
20 box jumps
30 wall-ball shots
♀ 10-lb medicine ball to a 9-foot target and a 20-inch box
♂ 14-lb medicine ball to a 10-foot target and a 24-inch box
Beginner option:
4 rounds for time of:
200-meter run
20 box jumps
20 wall-ball shots
♀ 6-lb medicine ball to an 8-foot target and a 12-inch box
♂ 10-lb medicine ball to a 9-foot target and a 12-inch box
Resources:
Running | Change in Support Drill
The Box Jump
The Wall-Ball Shot
Watch “Kelly Kelly Does Kelly”
Find a gym near you:
View the CrossFit map

Friday 260227
Open Workout 26.1
For time:
20 wall-ball shots
18 box jump-overs
30 wall-ball shots
18 box jump-overs
40 wall-ball shots
18 medicine-ball box step-overs
66 wall-ball shots
18 medicine-ball box step-overs
40 wall-ball shots
18 box jump-overs
30 wall-ball shots
18 box jump-overs
20 wall-ball shots
♀ 14-lb medicine ball to a 9-foot target and a 20-inch box
♂ 20-lb medicine ball to a 10-foot target and a 24-inch box
Time cap: 12 minutes
Visit the CrossFit Games website for full details, including Scaled, Foundations (beginner), and Age-Group variations of the workout. Adaptive versions of the workout can be found through WheelWOD.
Resources:
The Wall-Ball Shot
Box Jump-Over Variations
CrossFit Open Workout 26.1
Visit the CrossFit Games website for full details, including Scaled, Foundations (beginner), and Age-Group variations of the workout.
Find a gym near you:
View the CrossFit map

Saturday 260117
10 rounds for time of:
60-foot sandbag bear-hug carry
7/10-calorie Echo bike
Rest 1 minute between rounds.
Post total time and load to comments.
Stimulus and Strategy:
Today, you'll take on 10 sprint-style efforts with a short break after each round. The loading for the workout is up to you, so choose a weight for the sandbag carry that is challenging but will allow for unbroken sets for all 10 rounds. If there is no sandbag available, perform the carry with two kettlebells in the rack position. Complete the Echo bike calories in 45 seconds or less each round; scale volume if needed to do so. Push the pace from the start.
Intermediate option:
Same as Rx'd.
Beginner option:
7 rounds for time of:
60-foot medicine-ball bear-hug carry
5/7-calorie Echo bike
Rest 1 minute between rounds.
Resources:
The Sandbag Bear-Hug Carry
From the Archives: Sandbag Training
The Rogue Echo Bike
Find a gym near you:
View the CrossFit map

Friday 251226
Complete as many rounds and reps as possible in 16 minutes of:
20-calorie row
20 wall-ball shots
20 pull-ups
♀ 14-lb medicine ball to a 9-foot target
♂ 20-lb medicine ball to a 10-foot target
Post rounds and reps to the comments.
Stimulus and Strategy:
Today's workout is a triplet. Manage your pace on the rower to maintain consistent sets on the wall-ball shots and pull-ups. Aim to complete the wall-ball shots in two sets or fewer. For the pull-ups, don’t push to failure too soon. If necessary, consider smaller sets and quicker breaks.
Scaling:
Reduce the loading of the medicine ball. Reduce the reps of each exercise.
To reduce the complexity of wall-ball shots, lower the height of the target. For the chin-over-bar pull-ups, perform jumping pull-ups.
In case of injury or limitation, perform the calories on any machine available. For the wall-ball shots, perform dumbbell thrusters. In case of a limitation, perform medicine-ball front squats or medicine-ball push presses to a target. For the chin-over-bar pull-ups, perform ring rows.
Intermediate option:
Complete as many rounds and reps as possible in 16 minutes of:
20-calorie row
15 wall-ball shots
10 pull-ups
♀ 10-lb medicine ball to a 9-foot target
♂ 14-lb medicine ball to a 10-foot target
Beginner option:
Complete as many rounds and reps as possible in 16 minutes of:
10-calorie row
10 wall-ball shots
10 ring rows
♀ 6-lb medicine ball to a 9-foot target
♂ 10-lb medicine ball to a 9-foot target
Coaching cues:
As your pull-ups begin to fatigue, focus on the back swing of your kip. Whether you are performing a kipping or a butterfly pull-up, the more you can press down in the back swing, the less pulling will be required to get your chin over the bar.
Resources:
Rowing Technique Tips
The Wall-Ball Shot
The Kipping Pull-Up
The Butterfly Pull-Up
The Ring Row
Find a gym near you:
View the CrossFit map

Friday 251212
For time:
10 deadlifts
10 hang squat cleans
20 strict ring dips
8 deadlifts
8 hang squat cleans
16 strict ring dips
6 deadlifts
6 hang squat cleans
12 strict ring dips
4 deadlifts
4 hang squat cleans
8 strict ring dips
2 deadlifts
2 hang squat cleans
4 strict ring dips
♀ 145-lb barbell
♂ 205-lb barbell
Stimulus and Strategy:
Today’s workout is a challenging triplet with a descending rep scheme. The two weightlifting movements are difficult because of the moderate-to-heavy loading while the gymnastics exercise challenges your strict pressing stamina. Manage your reps and avoid pushing to failure early on. Expect the deadlifts to be the easier of the two weightlifting movements. Break the hang squat cleans as needed, but remember, the more you drop the bar, the more you have to pick it up.
Scaling:
Reduce the loading of the barbell.
To reduce the complexity of the strict ring dips, perform foot-assisted ring dips or jumping ring dips. If you are choosing foot-assisted dips, use your feet or foot as much or as little as needed while still maintaining a full range of motion. For the deadlifts and hang squat cleans, use a pair of dumbbells or a medicine ball.
In case of injury or limitation, for the ring dips, perform box/bench dips or push-ups. For the deadlifts, consider sumo deadlifts with a barbell or kettlebell. For the hang squat cleans, consider breaking the movement into its component pieces of a hang power clean, plus a front squat. In case of a limitation, you could perform hang power cleans or front squats.
Intermediate option:
For time:
10 deadlifts
10 hang squat cleans
20 foot-assisted ring dips
8 deadlifts
8 hang squat cleans
16 foot-assisted ring dips
6 deadlifts
6 hang squat cleans
12 foot-assisted ring dips
4 deadlifts
4 hang squat cleans
8 foot-assisted ring dips
2 deadlifts
2 hang squat cleans
4 foot-assisted ring dips
♀ 105-lb barbell
♂ 155-lb barbell
Beginner option:
For time:
10 deadlifts
10 hang squat cleans
10 foot-assisted ring dips
8 deadlifts
8 hang squat cleans
8 foot-assisted ring dips
6 deadlifts
6 hang squat cleans
6 foot-assisted ring dips
4 deadlifts
4 hang squat cleans
4 foot-assisted ring dips
2 deadlifts
2 hang squat cleans
2 foot-assisted ring dips
♀ 35-lb barbell
♂ 45-lb barbell
Coaching cues:
With the heavier loading on the hang squat cleans, focus on jumping to full hip extension and getting the elbows around quickly so your elbows are high in the rack position.
Resources:
The Deadlift
The Hang Squat Clean
The Strict Ring Dip
Foot-Assisted Ring Dip Scaling Tips
Find a gym near you:
View the CrossFit map

Friday 251205
For time:
600-meter row
12 hang squat cleans
6 wall walks
400-meter row
8 hang squat cleans
4 wall walks
200-meter row
4 hang squat cleans
2 wall walks
♀ 125 lb
♂ 185 lb
Stimulus and Strategy:
Today’s workout is a triplet with a descending rep scheme. The loading of the barbell should be moderate to heavy. Choose a weight that allows you to complete the reps in three sets or fewer. Push the pace on the rower and manage your reps on the wall walks. Breathe between reps and don’t burn out in the first set.
Scaling:
Reduce the loading of the barbell. Reduce the distance on the rower.
To reduce the complexity of the hang squat cleans, use a pair of dumbbells or consider performing a hang power clean, plus a front squat for each rep. For the wall walks, reduce the range of motion by only taking 1-3 steps toward the wall.
In case of injury or limitation, for the row, perform a 600/400/200-meter run or 500/900/1,300-meter Echo bike. For the hang squat cleans, consider hang medicine-ball cleans or kettlebell swings, plus a goblet squat. For the wall walks, perform inchworms, plus a push-up for each rep.
Intermediate option:
For time:
600-meter row
12 hang squat cleans
6 partial wall walks (2 steps toward the wall)
400-meter row
8 hang squat cleans
4 partial wall walks (2 steps toward the wall)
200-meter row
4 hang squat cleans
2 partial wall walks (2 steps toward the wall)
♀ 95 lb
♂ 135 lb
Beginner option:
For time:
600-meter row
12 hang squat cleans
6 inchworms
400-meter row
8 hang squat cleans
4 inchworms
200-meter row
4 hang squat cleans
2 inchworms
♀ 35 lb
♂ 45 lb
Coaching cues:
For the hang squat cleans, finish the second pull before getting under the barbell. Focus on jumping and getting the shoulders behind the barbell before pulling under the bar.
Resources:
Rowing
The Hang Squat Clean
The Wall Walk
The Inchworm
Find a gym near you:
View the CrossFit map

Friday 251128
For time:
21-15-9 reps of:
Wall-ball shots
Toes-to-bars
Rest 2 minutes
15-12-9 reps of:
Wall-ball shots
Toes-to-bars
♀ 20-lb medicine ball to a 9-foot target
♂ 30-lb medicine ball to a 10-foot target
Post total time, including the rest, to comments.
Stimulus and Strategy:
Today’s workout contains two sprinty couplets. There are fewer reps in the second couplet to help you maintain your sprint pace and deal with fatigue. Use a heavier medicine ball than you are accustomed to using on wall-ball shots. If you are unable to go heavier and only have the ball you regularly use, try throwing to a higher target. On the toes-to-bars, hang on for big sets and get back to the medicine ball as quickly as possible.
Scaling:
Reduce the loading of the medicine ball.
To reduce the complexity of the wall-ball shots, reduce the height of the target. For the toes-to-bars, reduce the range of motion by performing knees-to-armpits or knees-to-chests.
In case of injury or limitation, for the wall-ball shots, perform dumbbell thrusters. If there is an overhead limitation, perform medicine-ball front squats. If there is a squatting limitation, perform medicine-ball push presses. For the toes-to-bars, perform hanging knee raises, V-ups, or AbMat sit-ups.
Intermediate option:
For time:
21-15-9 reps of:
Wall-ball shots
Knees-to-armpits
Rest 2 minutes
15-12-9 reps of:
Wall-ball shots
Knees-to-armpits
♀ 14-lb medicine ball to a 9-foot target
♂ 20-lb medicine ball to a 10-foot target
Beginner option:
For time:
15-12-9 reps of:
Wall-ball shots
Hanging knee raises
Rest 2 minutes
12-9-6 reps of:
Wall-ball shots
Hanging knee raises
♀ 6-lb medicine ball to a 9-foot target
♂ 10-lb medicine ball to a 10-foot target
Coaching cues:
To increase the height in your back swing and decrease the effort it takes to get your toes to the bar, focus on pressing down against the pull-up bar and leaning back to get your shoulders behind the bar.
Resources:
The Wall-Ball Shot
The Kipping Toes-to-Bar
The Hanging Knee Raise | Kipping
Find a gym near you:
View the CrossFit map

Saturday 251108
For time:
100 wall-ball shots
25 burpees
75 kettlebell swings
25 burpees
50 knees-to-elbows
25 burpees
♀ 14-lb medicine ball to a 9-foot target and a 35-lb kettlebell
♂ 20-lb medicine ball to a 10-foot target and a 53-lb kettlebell
Stimulus and Strategy:
Today’s workout is a chipper with a repeating burpee element. The loading for both the wall-ball shots and the kettlebell swings should allow you to perform consistent sets of 15-20 reps or more. For the knees-to-elbows, choose a variation that allows you to perform 5-7 reps or more at a time. Have fun with this one, and as with any chipper, just keep “chipping” away.
Scaling:
Reduce the loading of the medicine ball and the kettlebell. Reduce the reps of all the movements.
To reduce the complexity of the wall-ball shots, reduce the height of the target. For the kettlebell swings, reduce the range of motion and perform Russian kettlebell swings. For the knees-to-elbows, reduce the range of motion.
In case of injury or limitation, for the wall-ball shots, perform medicine-ball front squats for an overhead limitation or medicine-ball push presses for a squatting limitation. For the burpees, perform up-downs. For the kettlebell swings, consider single-arm Russian kettlebell swings or kettlebell deadlifts. For the knees-to-elbows, perform hanging knee raises or lying toes-to-bars.
Intermediate option:
For time:
80 wall-ball shots
20 burpees
60 kettlebell swings
20 burpees
40 knees-to-chests
20 burpees
♀ 10-lb medicine ball to a 9-foot target and a 26-lb kettlebell
♂ 14-lb medicine ball to a 10-foot target and a 35-lb kettlebell
Beginner option:
2 rounds for time of:
25 wall-ball shots
5 burpees
20 kettlebell swings
5 burpees
15 hanging knee raises
5 burpees
♀ 6-lb medicine ball to a 9-foot target and an 18-lb kettlebell
♂ 10-lb medicine ball to a 10-foot target and a 26-lb kettlebell
Coaching cues:
The finish position of the kettlebell swing is like a standing plank hold, minus the position of your arms. Your midsection should be rigid and unchanging while your shoulders, hips, knees, and ankles are all in a straight line. A plank on the floor is no different.
Resources:
The Wall-Ball Shot
The Burpee
The Kettlebell Swing
The Knees-to-Elbows
Kipping Hanging Knee Raise
Find a gym near you:
View the CrossFit map

Saturday 251101
For calories and load:
0:00-5:00
Max power clean
5:00-10:00
Max-calorie Echo bike
10:00-15:00
Max power clean
15:00-20:00
Max-calorie Echo bike
For your score, add both of your best lifts and total calories together.
Post score to comments.
Stimulus and Strategy:
Today’s workout is a bit of a choose-your-own-adventure, depending on how you feel from yesterday. That being said, today is an opportunity to lift heavy and push the intensity on the bike. Can you lift just as much weight on your second power clean attempt as you did on your first? Do you “game” the bike in an attempt to match your clean weight? Or do you hold nothing back and let the chips land where they may? Either way, work hard today and have fun.
Scaling:
To reduce the complexity of the power cleans, reduce the loading and focus on your technique. You may also consider performing hang power cleans.
In case of injury or limitation, perform your calories on any machine available. For the power cleans, consider dumbbell power cleans, Russian kettlebell swings, or even medicine-ball cleans.
Intermediate option:
Same as Rx’d.
Beginner option:
Same as Rx’d.
Coaching cues:
As the power cleans get heavier, the instinct is to try and “sneak” under the barbell. Instead, focus on standing up as tall as you possibly can, then pull yourself underneath the barbell.
Resources:
The Power Clean
Rogue Echo Bike
Find a gym near you:
View the CrossFit map

Saturday 251025
3 rounds for time of:
800-meter run
30 dumbbell hang squat cleans
200-meter dumbbell front-rack carry
♀ 20-lb dumbbells
♂ 35-lb dumbbells
Post times to comments.
Stimulus and Strategy:
Today’s workout is a bit of a grind, challenging your stamina, endurance, midline, and mental fortitude. Use a weight for the dumbbell hang squat cleans that allows you to complete your reps in 3 sets or less. If you can hang on for bigger chunks, do it. The dumbbell front-rack carry is meant to be mentally and physically tough. For the carry, don’t rest the dumbbells vertically on the shoulders. Instead, try to maintain a true dumbbell front-rack position with one head of the dumbbell resting on the shoulder, the hand on the handle, and the elbows up. Embrace your time spent with these dumbbells and have fun.
Scaling:
Reduce the weight of the dumbbells. Reduce the distance of the run and front-rack carry.
To reduce the complexity of the hang squat cleans, perform hang medicine-ball cleans, or reduce the reps and perform hang power cleans plus a front squat. For the front-rack carry, use a single dumbbell.
In case of injury or limitation, for the hang squat cleans, consider dumbbell or kettlebell goblet squats or air squats. For the front-rack carry, consider a farmers carry. For the 800-meter run, perform 1,750/2,500 meters on the Echo bike or 800/1,000 meters on the rower.
Intermediate option:
3 rounds for time of:
800-meter run
20 dumbbell hang squat cleans
200-meter dumbbell front-rack carry
♀ 15-lb dumbbells
♂ 25-lb dumbbells
Beginner option:
3 rounds for time of:
400-meter run
15 dumbbell hang squat cleans
100-meter dumbbell front-rack carry
♀ 10-lb dumbbells
♂ 15-lb dumbbells
Coaching cues:
In the dumbbell hang squat clean, focus on jumping and shrugging with straight arms before pulling the dumbbells to the shoulders and your body into the bottom of the squat.
Resources:
Running Drills | High Knees and Butt Kickers
The Dumbbell Hang Squat Clean
Double-Dumbbell Front-Rack Carry
Find a gym near you:
View the CrossFit map

Tuesday 251014
For time:
50 power cleans
♀ 125 lb
♂ 185 lb
Post time to comments.
Stimulus and Strategy:
Today’s workout is straightforward — simply move through the power cleans as quickly as possible. The loading of the barbell is meant to be moderate to heavy. This means some may choose to perform singles for all their reps, while others may be able to complete several sets of touch-and-go reps. Either way, a good goal is aiming to complete 5 reps or more per minute. When you are taking a break, don’t let that bar sit there for too long; get your hands back on the bar quickly.
Scaling:
Reduce the load of the barbell.
To reduce the complexity of the power clean, perform a hang power clean or consider using dumbbells.
In case of injury or limitation, perform a sumo deadlift high pull or medicine-ball clean if there is a limitation with the rack position.
Intermediate option:
For time:
50 power cleans
♀ 95 lb
♂ 135 lb
Beginner option:
For time:
50 power cleans
♀ 35 lb
♂ 45 lb
Coaching cues:
On the power clean, after you finish your pull, focus on driving your elbows around the barbell as quickly as possible.
Resources:
The Power Clean
Find a gym near you:
View the CrossFit map

Friday 251010
Complete as many reps as possible in 15 minutes of:
3 wall-ball shots
3 lateral burpees over the medicine ball
3-second L-sit hold
After each round, add 3 reps to the wall-ball shots and burpees, and add 3 seconds to the L-sit holds until time expires.
♀ 14-lb medicine ball to a 9-foot target
♂ 20-lb medicine ball to a 10-foot target
Post rounds and reps completed.
Stimulus and Strategy:
Today is a triplet of increasing repetitions and seconds. Expect the first few rounds to go quickly, and then slow down as the reps reach double digits. Use a weight for the medicine ball you can perform mostly unbroken. The burpees over the medicine ball are an added challenge because of the height of the ball, so make a conscious effort to jump a little higher than you normally would. On the L-sit hold, choose a variation that allows you to consistently hold for at least 10 seconds. What you perform your L-sit holds on is totally up to you — dumbbells, parallettes, boxes, or whatever you have available.
Scaling:
Reduce the loading of the medicine ball. Reduce the number of reps you increase each round by. Consider increasing by 1 or 2, instead of 3.
To reduce the complexity of the wall-ball shots, reduce the height of the target. For the burpees, step over the medicine ball or perform a regular burpee. For the L-sit hold, hold one leg straight with the other bent, or bend both legs.
In case of injury or limitation, for the wall-ball shots, perform medicine-ball front squats for an overhead limitation, or medicine-ball push presses for a squatting limitation. For the burpees, perform up-downs. For the L-sit holds, perform seated leg-raise holds with one or both legs.
Intermediate option:
Complete as many reps as possible in 15 minutes of:
3 wall-ball shots
3 lateral burpees over the medicine ball
3-second L-sit hold, both legs bent
After each round, add 3 reps to the wall-ball shots and burpees, and add 3 seconds to the L-sit holds until time expires.
♀ 10-lb medicine ball to a 9-foot target
♂ 14-lb medicine ball to a 10-foot target
Beginner option:
Complete as many reps as possible in 15 minutes of:
3 wall-ball shots
3 lateral burpees + step over the medicine ball
3-second seated leg raise hold, both legs bent
After each round, add 3 reps to the wall-ball shots and burpees, and add 3 seconds to the seated leg raise holds until time expires.
♀ 6-lb medicine ball to a 9-foot target
♂ 10-lb medicine ball to a 10-foot target
Coaching cues:
To encourage your body to raise your legs higher in the L-sit hold, try to bring your nose to your toes.
Resources:
The Wall-Ball Shot
The L-Sit Hold
L-Sit Scaling
Find a gym near you:
View the CrossFit map

Friday 251003
Complete as many rounds and reps as possible in 10 minutes of:
3 power cleans
15-foot handstand walk
45 double-unders
15-foot handstand walk
♀ 125 lb
♂ 185 lb
Post rounds and reps to comments.
Stimulus and Strategy:
Today’s workout combines a heavier lift with a sprinkle of higher-skill gymnastics. This sprinkle should allow you to keep moving through your rounds with minimal reduction in pace. The loading on the barbell is meant to be moderate to heavy. Some may be able to perform a few touch-and-go reps, while others work to maintain quick singles. Choose options that allow you to complete at least 5 rounds.
Scaling:
Reduce the load of the barbell. Reduce the reps on the jump rope.
To reduce the complexity of the power clean, perform a hang power clean. To scale the handstand walks, complete a half circle around a box with your feet on the box (walking laterally around the box). You can also scale the handstand walk to 3 inchworms or bear crawls. For the double-unders, practice the movement for 30 seconds or perform single-unders.
In case of injury or limitation, for the power cleans, consider medicine-ball or dumbbell power cleans. For the handstand walks, consider alternating dumbbell shoulder presses or shoulder taps in a plank hold. Consider performing jumping jacks, penguin taps, or alternating toe taps on a low box in place of the double-unders.
Intermediate option:
Complete as many rounds and reps as possible in 10 minutes of:
3 power cleans
1 half circle lateral walk around a box (feet on the box), moving to your right
20 double-unders
1 half circle lateral walk around a box (feet on the box), moving to your left
♀ 95 lb
♂ 135 lb
Beginner option:
Complete as many rounds and reps as possible in 10 minutes of:
3 power cleans
3 inchworms
20 single-unders
15-foot bear crawl
♀ 35 lb
♂ 45 lb
Coaching cues: On your handstand walks, don’t focus or look for your “end point.” Walk through the finish line.
Resources:
The Power Clean
The Handstand Walk
The Double-Under
Handstand Walk Around Box
The Bear Crawl
Find a gym near you:
View the CrossFit map

Friday 250926
For time:
10 wall-ball shots
10 snatches
20 wall-ball shots
20 handstand push-ups
30 wall-ball shots
30 box jumps
40 wall-ball shots
40 deadlifts
♀ 14-lb medicine ball to a 9-foot target, 105-lb barbell, and a 20-inch box
♂ 20-lb medicine ball to a 10-foot target, 155-lb barbell, and a 24-inch box
Post time to comments.
Stimulus and Strategy:
Today’s workout is a chipper with an increasing number of wall-ball shots throughout. Like most chippers, manage your reps, minimize long breaks, and — pun intended — keep chipping away at the movements. The loading of the barbell is meant to be moderate for the snatches and light to moderate for the deadlifts. You may power or squat the snatches. Try to hang on to large chunks of wall-ball shots and see if you can go unbroken on the deadlifts to finish.
Scaling:
Reduce the loading of the medicine ball and barbell. Reduce the repetitions of each movement. Reduce the height of the box.
To reduce the complexity of the snatches, perform hang snatches. For the handstand push-ups, perform pike push-ups.
In case of injury or limitation, for the snatches, perform dumbbell snatches or power cleans if there is an overhead limitation. For the wall-ball shots, perform dumbbell thrusters, medicine-ball front squats (overhead limitation), or medicine-ball push presses (squat limitation). For the handstand push-ups, consider hand-release push-ups or seated dumbbell shoulder presses. For the box jumps, perform step-ups. For the deadlifts, perform sumo deadlifts, dumbbell deadlifts, or good mornings.
Intermediate option:
For time:
10 wall-ball shots
10 snatches
20 wall-ball shots
20 pike push-ups
30 wall-ball shots
30 box jumps
40 wall-ball shots
40 deadlifts
♀ 10-lb medicine ball to a 9-foot target, 75-lb barbell, and a 20-inch box
♂ 14-lb medicine ball to a 10-f00t target, 115-lb barbell, and a 24-inch box
Beginner option:
For time:
10 wall-ball shots
10 snatches
15 wall-ball shots
15 hand-release push-ups from the knees
20 wall-ball shots
20 box step-ups
25 wall-ball shots
25 deadlifts
♀ 6-lb medicine ball to a 9-foot target, 35-lb barbell, and a 12-inch box
♂ 14-lb medicine ball to a 10-foot target, 45-lb barbell, and a 20-inch box
Coaching cues:
In the wall-ball shot, utilize your legs and hips to drive the ball up to the target. Keep your arms relaxed on the descent and use the momentum from your lower body to propel the ball to the target.
Resources:
The Wall-Ball Shot
The Snatch
The Power Snatch
The Kipping Handstand Push-Up
The Box Jump
The Deadlift
Pike Push-Up
Hand-Release Push-Up From the Knees
The Box Step-Up
Find a gym near you:
View the CrossFit map

Wednesday 250910
4 rounds for time of:
10 triple-unders
20 chest-to-bar pull-ups
30 wall-balls shots
♀ 14-lb medicine ball to a 9-foot target
♂ 20-lb medicine ball to a 10-foot target
Stimulus and Strategy:
Today’s workout is a combination of skills. The triple-under is meant to be the higher-skill challenge, so choose a movement that allows you to focus on a skill before moving on to the lower-skill exercises. For the pull-ups, choose an option that allows you to maintain consistent sets of 5 reps. The wall-ball shots are meant to be completed in larger chunks, and the easiest of the three movements.
Scaling:
Reduce the reps of each movement. Reduce the loading of the medicine ball.
To reduce the complexity of triple-unders, consider double-unders or single-unders. Other variations may also be practiced; for example, crossovers, or one-foot single-unders or double-unders. For the chest-to-bar pull-ups, reduce the range of motion to chin-over-bar pull-ups or jumping pull-ups.
In case of injury or limitation, for the triple-unders, perform penguin taps. For the chest-to-bar pull-ups, perform ring rows. For the wall-ball shots, perform medicine-ball front squats for an overhead limitation, or medicine-ball push presses for a squatting limitation.
Intermediate option:
4 rounds for time of:
10 single-leg double-unders
20 pull-ups
30 wall-balls shots
♀ 10-lb medicine ball to a 9-foot target
♂ 14-lb medicine ball to a 10-foot target
Beginner option:
3 rounds for time of:
10 single-unders
15 ring rows
20 wall-balls shots
♀ 6-lb medicine ball to a 9-foot target
♂ 10-lb medicine ball to a 10-foot target
Coaching cues:
For the triple-unders, spin fast from the wrists, not the shoulders — stay tall and punch your toes down as you jump.
Resources:
Triple-Unders
The Chest-to-Bar Pull-Up
The Wall-Ball Shot
The Kipping Pull-Up
The Single-Under
The Ring Row
Find a gym near you:
View the CrossFit map

Saturday 250830
Complete as many rounds and reps as possible in 20 minutes of:
20 lateral burpees over the dumbbell
20 alternating dumbbell hang clean-to-overheads
200-meter row
♀ 35-lb dumbbell
♂ 50-lb dumbbell
Post rounds and reps to comments.
Stimulus and Strategy:
Today’s workout is a grind. Move at a consistent pace and aim to complete at least 4 rounds. The loading of the dumbbell should allow you to complete your reps in 2 sets or less in each round. If you need a place to slow down and recover, do that on the rower. In workouts like these, take it one round at a time and don’t get ahead of yourself or bother looking at the clock — it will only disappoint you.
Scaling:
Reduce the load of the dumbbell. Reduce the reps of the burpees and the hang clean-to-overheads. Reduce the distance on the rower.
To reduce the complexity of the lateral burpees over the dumbbell, perform these as standard burpees. For the hang clean-to-overheads, consider muscle clean and shoulder presses or kettlebell swings.
In case of injury or limitation, for the row, consider a 200-meter run or a 400-meter bike. For the lateral burpees over the dumbbell, perform up-downs over the dumbbell or in place. For the dumbbell hang clean-to-overheads, perform hang clean and shoulder presses with a medicine ball or a single-arm Russian kettlebell swing if there is an overhead limitation.
Intermediate option:
Complete as many rounds and reps as possible in 20 minutes of:
20 lateral burpees over the dumbbell
20 alternating dumbbell hang clean-to-overheads
200-meter row
♀ 20-lb dumbbell
♂ 35-lb dumbbell
Beginner option:
Complete as many rounds and reps as possible in 12 minutes of:
10 burpees
10 alternating dumbbell hang clean-to-overheads
200-meter row
♀ 10-lb dumbbell
♂ 15-lb dumbbell
Coaching cues:
During the row, ensure you maintain the proper sequencing of each pull for the most efficiency and power output, and to preserve your energy and push harder for longer. Think about moving through each pull by initiating with a leg drive, then shifting your hips back, and finally pulling with your arms. On the return, it’s the opposite — the arms straighten, the hips flex, and then the legs bend.
Resources:
Rowing Technique Tips
Find a gym near you:
View the CrossFit map

Saturday 250823
21-18-15-12-9-6-3 reps for time of:
Knees-to-elbows
Dumbbell thrusters
♀ 20-lb dumbbells
♂ 35-lb dumbbells
Post time to comments.
Stimulus and Strategy:
This descending rep scheme contains two movements with longer ranges of motion. Choose a weight for the dumbbell thrusters that allows you to finish your reps in 2 sets or less. Challenge yourself to go unbroken on as many sets as possible. For the knees-to-elbows, choose a movement variation that allows you to maintain consistent sets of 5 or more reps.
Scaling:
Reduce the loading of the dumbbells. Reduce the reps of each movement.
To reduce the complexity of the knees-to-elbows, bring the knees to a lower target. For the dumbbell thrusters, perform the movement with a single dumbbell or perform medicine-ball thrusters.
In case of injury or limitation, for the knees-to-elbows, perform V-ups or sit-ups. For the thrusters, perform front squats if there is an overhead limitation or push presses if there is a squatting limitation.
Intermediate option:
21-18-15-12-9-6-3 reps for time of:
Knees-to-chests
Dumbbell thrusters
♀ 15-lb dumbbells
♂ 25-lb dumbbells
Beginner option:
15-12-9-6-3 reps for time of:
Hanging knee raises
Dumbbell thrusters
♀ 10-lb dumbbells
♂ 15-lb dumbbells
Coaching cues:
With the dumbbell thrusters, drive the dumbbells up with your legs, keep the elbows up and in front of you, and finish with a locked-out overhead position — don’t let the dumbbells drift forward.
Resources:
The Strict Knees-to-Elbows
The Dumbbell Thruster
Kipping Hanging Knee Raises
Knees-to-Elbows Tips
Find a gym near you:
View the CrossFit map
Saturday 250809
Every 10 minutes for 30 minutes:
500-meter row
Max unbroken set of wall-ball shots
Rest with the remaining time in the 10-minute interval.
♀ 20-lb medicine ball to a 9-foot target
♂ 30-lb medicine ball to a 10-foot target
Post total wall-ball-shot reps to comments.
Stimulus and Strategy:
Today’s workout will test your mental fortitude. How many wall-ball shots can you perform before you mentally and physically need a break? Just when you think you are ready to stop, remember, you can always do one more rep. To get the most out of the effort, choose a load that allows you to perform at least 25 repetitions in each set. As an added challenge, push the pace on the rower. This will make for an extra special time.
Scaling:
Reduce the load of the medicine ball. Reduce the distance on the rower.
To reduce the complexity of the wall-ball shots, perform dumbbell thrusters with a light pair of dumbbells.
In case of an injury or limitation, for the wall-ball shots, perform medicine-ball front squats (overhead limitation) or medicine-ball push presses (squat limitation). For the row, perform 1,250 meters on the Echo bike, 400-meter run, or 500 meters on the ski erg.
Intermediate option:
Every 10 minutes for 30 minutes:
500-meter row
Max unbroken set of wall-ball shots
Rest with the remaining time in the 10-minute interval.
♀ 14 lb medicine ball to a 9-foot target
♂ 20 lb medicine ball to a 10-foot target
Beginner option:
Every 10 minutes for 30 minutes:
250-meter row
20 wall-ball shots
Rest with the remaining time in the 10-minute interval.
♀ 6 lb medicine ball to a 9-foot target
♂ 10 lb medicine ball to a 10-foot target
Coaching cues:
As you descend in the squat of the wall-ball shot, focus on sending the hips back and twisting the knees apart.
Resources:
Rowing Technique Tips
The Wall-Ball Shot
Find a gym near you:
View the CrossFit map
Friday 250711
On an 8-minute clock for 3 rounds, complete:
800/1,000-meter row
15 lateral burpees over the rower
30 wall-ball shots
Rest with any remaining time in the interval.
♀ 14-lb medicine ball to a 9-foot target
♂ 20-lb medicine ball to a 10-foot target
Stimulus and Strategy:
Today’s workout is three intervals. The faster you complete the interval, the more rest you get before the next. The goal is to have at least 1 minute of rest; however, more than 2 minutes is definitely possible. Push the pace on each movement and don’t hold anything back. There is nothing to gain from “gaming” each interval. Push hard and see what happens.
Scaling:
Reduce the distance on the rower. Reduce the loading of the wall-ball shots.
To reduce the complexity of the lateral burpees over the rower, perform burpees with a step over the rower or burpees in place. For the wall-ball shots, reduce the height of the target.
In case of an injury or limitation, consider performing up-downs in place of the burpees. If you have an overhead limitation, perform medicine-ball front squats or if there is a squatting limitation, perform medicine-ball push presses. For the meters on the rower, perform a 1,750/2,500-meter Echo bike or an 800-meter run.
Intermediate option:
On an 8-minute clock for 3 rounds, complete:
600/750-meter row
15 lateral burpees over the rower
20 wall-ball shots
Rest with any remaining time in the interval.
♀ 10-lb medicine ball to a 9-foot target
♂ 14-lb medicine ball to a 10-foot target
Beginner option:
On an 8-minute clock for 3 rounds, complete:
400/500-meter row
10 burpees
15 wall-ball shots
Rest with any remaining time in the interval.
♀ 6-lb medicine ball to a 9-foot target
♂ 10-lb medicine ball to a 10-foot target
Coaching cues:
To help increase the pace of the wall-ball shots, don’t wait for the ball to come to you, grab the ball as it returns from the target and pull it down to the bottom of your next rep.
Resources:
Rowing
Lateral Burpee Over the Rower
The Wall-Ball Shot
Find a gym near you:
View the CrossFit map

Friday 250704
Triple Deuce
As many rounds and reps as possible in 20 minutes of:
22 burpees
22 air squats
22 pull-ups
22 sandbag ground-to-over-the-shoulders
722-meter run
♀ 40-lb sandbag
♂ 60-lb sandbag
Post rounds and reps to comments.
Army Sgt. 1st Class Jamie Nicholas, Army Sgt. 1st Class Gary Vasquez, and Army Capt. Richard Cliff, Jr., assigned to the 1st Battalion, 7th Special Forces Group in Fort Bragg, North Carolina, died Sept. 29, 2008, in Yakhchal, Afghanistan, from wounds sustained when their vehicle encountered an improvised explosive device during mounted operations.
Stimulus and Strategy:
This Hero workout will test cardiorespiratory endurance and stamina, where completing 3 or more rounds is a general guideline to follow. Since this is a Hero workout, feel free to attempt it as prescribed, even if 3 rounds may not be within reach. The air squats can be performed quickly, while the burpees and pull-ups may need some pacing to be able to complete them at a consistent pace. The sandbag is intended to be light so 22 reps can be completed with minimal rest between each.
Scaling:
Reduce the loading of the sandbag. Reduce the reps of the movements. Reduce the distance of the run.
To reduce the complexity of the burpees, perform up-downs. For the pull-ups, consider performing jumping pull-ups or ring rows. For the sandbag ground-to-over-the-shoulders, perform dumbbell power cleans, hang power cleans, or even light medicine-ball cleans over the shoulder
In case of injury or limitation, perform a 1,750/2,500-meter Echo bike or 800/1,000-meter row in place of the 722-meter run. For the air squats, consider squatting to a target that allows for a pain-free range of motion.
Intermediate option:
As many rounds and reps as possible in 20 minutes of:
15 burpees
15 air squats
15 jumping pull-ups
15 sandbag ground-to-over-the-shoulders
722-meter run
♀ 30-lb sandbag
♂ 45-lb sandbag
Beginner option:
As many rounds and reps as possible in 15 minutes of:
12 burpees
12 air squats
12 ring rows
12 sandbag ground-to-over-the-shoulders
400-meter run
♀ 20-lb sandbag
♂ 30-lb sandbag
Coaching cues:
Focus on using your hips and legs to launch the sandbag over your shoulders instead of solely pulling with your arms.
Resources:
The Burpee
The Air Squat
The Kipping Pull-Up
Running | Falling Forward
Sandbag Training
Jumping Pull-Up
The Ring Row
Find a gym near you:
View the CrossFit map

Saturday 250614
For time:
800-meter run
40 wall-ball shots
400-meter run
30 wall-ball shots
200-meter run
20 wall-ball shots
♀ 14-lb medicine ball to a 9-foot target
♂ 20-lb medicine ball to a 10-foot target
Post time to comments.
Stimulus and Strategy:
Today’s workout is a descending ladder of running and wall-ball shots. Push to complete each set of wall-ball shots in big chunks. If you can go unbroken, do it and then push the pace on the runs. As soon as you finish a set of wall-ball shots, get moving on to the next run.
Scaling:
Reduce the load of the medicine ball. Reduce the distance of each run.
To reduce the complexity of the wall-ball shots, lower the height of the target and reduce the loading of the medicine ball.
In case of injury or limitation, perform a 1,750/2,500-meter Echo bike or 800/1,000-meter row in place of the 800-meter run. For the 400-meter run, perform 900/1,250-meter Echo bike or 400/500-meter row. For the 200-meter run, perform a 500/700-meter Echo bike or 200/250-meter row. For the wall-ball shots, perform a medicine-ball squat (overhead limitation) or a medicine-ball push press (squat limitation).
Intermediate option:
For time:
800-meter run
40 wall-ball shots
400-meter run
30 wall-ball shots
200-meter run
20 wall-ball shots
♀ 10-lb medicine ball to a 9-foot target
♂ 14-lb medicine ball to a 10-foot target
Beginner option:
For time:
400-meter run
20 wall-ball shots
200-meter run
15 wall-ball shots
200-meter run
10 wall-ball shots
♀ 6-lb medicine ball to a 9-foot target
♂ 10-lb medicine ball to a 10-foot target
Coaching cues:
After you throw the medicine ball in the wall-ball shot, bring your hands down right in front of your face and relax your shoulders. This will help you reduce shoulder fatigue.
Resources:
CrossFit Running Course
The Wall-Ball Shot
Find a gym near you:
View the CrossFit map

Saturday 250503
Fight Gone Bad
3 rounds for max reps of:
1 minute of wall-ball shots
1 minute of sumo deadlift high pulls
1 minute of box jumps
1 minute of push presses
1 minute of rowing calories
Rest 1 minute
♀ 14-lb medicine ball to 9 feet, 55-lb barbell, 20-inch box
♂ 20-lb medicine ball to 10 feet, 75-lb barbell, 20-inch box
Post total reps to comments and log your score in the CrossFit app (CrossFit Benchmarks are located in the "Progress" tab).
Compare to 240412
Stimulus and Strategy:
Today’s workout is a classic CrossFit benchmark. Look back to your previous score to help you navigate today’s effort. Push to keep moving for as much of each minute as possible. Capitalize on movements you excel at and pace yourself on your weaker movements. If you have completed this workout before, don’t pace it. Give the first round a run for its money, and then hang on for the ride.
Scaling:
Reduce the loading of the barbell and medicine ball.
Reduce the complexity of the wall-ball shots by lowering the height of the target. For the sumo deadlift high pulls, perform the movement with a kettlebell or dumbbell. For the box jumps, reduce the height of the box. For push presses, perform the movement with dumbbells.
In case of injury or limitation, use any machine available to perform calories. For the wall-ball shots, perform medicine-ball squats (overhead limitation). For the sumo deadlift high pulls, perform kettlebell or dumbbell sumo deadlifts or Russian kettlebell swings. For the box jumps, perform step-ups. For the push presses, perform single-arm dumbbell push presses or shoulder presses.
Intermediate option:
Same as Rx’d.
Beginner option:
3 rounds for max reps of:
1 minute of wall-ball shots
1 minute of sumo deadlift high pulls
1 minute of box jumps
1 minute of push presses
1 minute of rowing calories
Rest 1 minute
♀ 6-lb medicine ball to 9 feet, 35-lb barbell, 12-inch box
♂ 10-lb medicine ball to 10 feet, 45-lb barbell, 12-inch box
Coaching cues:
From the top of the sumo deadlift high pull, focus on returning the hands to the hips before hinging at the hips to return the barbell to the floor.
Resources:
The Wall-Ball Shot
The Sumo Deadlift High Pull
The Box Jump
The Push Press
Rowing Technique Tips
Find a gym near you:
View the CrossFit map

Wednesday 250423
Karen
For time:
150 wall-ball shots
♀ 14-lb ball to 9-foot target
♂ 20-lb ball to 10-foot target
Compare to 210603.
Post time to comments.
Stimulus and Strategy:
Today’s workout is a classic benchmark containing a high volume of a light weightlifting movement. If you have completed this workout before, be sure to look back at your score to help you navigate today’s effort. Choose a load that allows you to hang on for large sets. Pacing and strategic rest periods will be required to log your best time.
Scaling:
Reduce the total number of reps. Reduce the weight of the medicine ball.
To reduce the complexity of the wall-ball shot, consider reducing the height of the target. You may also consider performing thrusters with a light pair of dumbbells.
In case of injury or limitation, perform dumbbell front squats for an overhead limitation or dumbbell push presses for a squat limitation.
Intermediate option:
For time:
150 wall-ball shots
♀ 10-lb ball to 9-foot target
♂ 14-lb ball to 10-foot target
Beginner option:
For time:
75 wall-ball shots
♀ 6-lb ball to 9-foot target
♂ 10-lb ball to 9-foot target
Coaching cues:
In each wall-ball shot, focus on pulling yourself to the bottom of each rep versus “falling” or collapsing to the bottom of the squat. This means actively thinking about screwing your feet into the ground and pulling the hips down to the bottom of the squat (hip crease below parallel).
Resources:
The Wall-Ball Shot
Find a gym near you:
View the CrossFit map

Friday 250328
5 rounds for time of:
12 chest-to-bar pull-ups
12 wall-ball shots
12 box jumps
♀ 14-lb medicine ball to 10 feet and a 20-inch box
♂ 20-lb medicine ball to 11 feet and a 24-inch box
Post times to comments.
Stimulus and Strategy:
Today’s workout is a classic triplet — two gymnastics movements and one weightlifting movement. You will notice the prescribed height for the wall-ball shots is higher than normal. If you do not have the height, use a heavier ball. Athletes should aim to complete this workout in 15 minutes or less. However, if you go a little longer because you are working on chest-to-bar pull-ups or grinding through the higher wall-ball target, today is a good day for that. Use caution when jumping on the box after the wall-ball shots. If necessary, take a few moments before attempting your first rep. As always, we encourage you to step down from the box on every rep.
Scaling: Reduce the weight of the medicine ball to allow you to hit the higher target. Reduce the height of the box.
To reduce the complexity of the chest to bar pull-ups, reduce the range of motion to chin-over-bar pull-ups. You may also consider jumping chest-to-bar pull-ups or ring rows. For the wall-ball shots, reduce the height of the target and the load of the ball. For the box jumps, reduce the height of the box. Aim to maintain the jump stimulus unless there is an injury or limitation.
In case of an injury or limitation, consider performing ring rows in place of the chest-to-bar pull-ups. For the wall-ball shots, perform medicine-ball squats for an overhead limitation or wall-ball push presses for a squatting limitation. For the box jumps, perform a box step-up to a lower box.
Intermediate option:
5 rounds for time of:
12 chin-over-bar pull-ups
12 wall-ball shots
12 box jumps
♀ 10-lb medicine ball to 10 feet and a 20-inch box
♂ 14-lb medicine ball to 11 feet and a 24-inch box
Beginner option:
4 rounds for time of:
8 ring rows
12 wall-ball shots
12 box step-ups
♀ 6-lb medicine ball to 9 feet and a 12-inch box
♂ 10-lb medicine ball to 10 feet and a 20-inch box
Coaching cues:
On the wall-ball shots, avoid holding your arms up and out as you wait for the ball to return. Instead, hold hands right below your chin with your elbows tight against your sides. As the ball returns, you can then meet the ball with your hands and descend into the next rep.
Resources:
The Kipping Chest-to-Bar Pull-Up
The Wall-Ball Shot
The Box Jump
The Kipping Pull-Up
The Ring Row
The Box Step-Up
Find a gym near you:
View the CrossFit map

Monday 250224
3 rounds for time of:
1,750/2,500-meter Echo bike
30 wall-ball shots
30 knees-to-elbows
♀ 14-lb medicine ball to a 9-foot target
♂ 20-lb medicine ball to a 10-foot target
Post times to the comments.
Stimulus and Strategy:
Today’s workout is a longer effort. Find a pace on the bike you can maintain — avoid coming out hot on the bike and seeing your pace fall off. Sit up tall, breathe, and focus on your cadence. Choose options for the wall-ball shots and the knees-to-elbows that allow you to complete the 60 reps in 5 minutes or less per round. Work hard and have fun!
Scaling:
Reduce the distance on the bike. Reduce the loading of the medicine ball.
To reduce the complexity of the wall-ball shots, consider reducing the height of the target and the weight of the medicine ball. For the knees-to-elbows, reduce the range of motion. Consider performing knees-to-chests or hanging knee raises.
In case of an injury or limitation, consider substituting the bike with an 800-meter run, or 800/1,000 meters on the rower or ski erg. For the wall-ball shots, perform a medicine-ball front squat, dumbbell push press, or light dumbbell thruster. For the knees-to-elbows, perform V-ups or sit-ups.
Intermediate option:
3 rounds for time of:
1,750/2,500-meter Echo bike
30 wall-ball shots
30 knees-to-chests
♀ 10-lb medicine ball to a 9-foot target
♂ 14-lb medicine ball to a 10-foot target
Beginner option:
3 rounds for time of:
900/1,250-meter Echo bike
15 wall-ball shots
15 hanging knee raises
♀ 10-lb medicine ball to a 9-foot target
♂ 14-lb medicine ball to a 10-foot target
Coaching cues:
On the knees-to-elbows, press down against the pull-up bar, lean back, and pull your knees up to your elbows.
Resources:
Rogue Echo Bike
The Wall-Ball Shot
The Knees-to-Elbows
Kipping Hanging Knee Raises
Find a gym near you:
View the CrossFit map

Friday 250207
On a 12-minute clock, complete:
75 wall-ball shots
800-meter run
Max burpee box jump-overs
♀ 14-lb ball to a 9-foot target and 24-inch box
♂ 20-lb ball to a 10-foot target and 30-inch box
Post reps to comments.
Stimulus and Strategy:
Today’s workout is a challenge. The goal is to finish the wall-ball shots and run as quickly as possible, and then complete as many burpee box jump-overs as possible in the remaining time. Both the wall-ball shots and the run should take no more than 5 minutes each to complete. This will leave you with at least 2 minutes to complete burpee box jump-overs. Push the pace from the beginning and hold on for the ride.
Scaling:
Reduce the loading of the wall-ball shots to maintain at least 15 reps per minute. If needed, reduce the reps as well as the load. Reduce the distance of the run to hit the intended time domain.
To reduce the complexity of the wall-ball shot, consider reducing the height of the target or simply performing a thruster with the medicine ball. For the burpee box jump-overs, reduce the height of the box or perform box step-overs.
In case of an injury or limitation, perform a medicine-ball front squat or push press. For the 800-meter run, consider biking 1,750/2,500 meters on an Echo bike or rowing 800/1,000 meters. On the burpee box jump-overs, perform up-downs in place of the burpee and step-ups to a low target for box jumps.
Intermediate option:
On a 12-minute clock, complete:
75 wall-ball shots
800-meter run
Max burpee box jump-overs
♀ 10-lb ball to a 9-foot target and 20-inch box
♂ 14-lb ball to a 10-foot target and 24-inch box
Beginner option:
On a 12-minute clock, complete:
50 wall-ball shots
400-meter run
Max burpee box step-overs
♀ 6-lb ball to a 9-foot target and 12-inch box
♂ 10-lb ball to a 10-foot target and 20-inch box
Coaching cues:
To increase your pace on the burpee box jump-overs, begin rotating on top of the box and step down facing the box before going into your next rep.
Resources:
The Wall-Ball Shot
Running: Falling Forward Drill
Burpee Box Jump-Over
Find a gym near you:
View the CrossFit map

Friday 241227
2 rounds for time of:
50 alternating dumbbell snatches
50 wall-ball shots
♀ 35-lb dumbbell and 14-lb medicine ball to 9-foot target
♂ 50-lb dumbbell and 20-lb medicine ball to 10-foot target
Post time to comments.
Compare to 231226.
Stimulus and Strategy:
Today’s workout is a short-to-moderate duration effort. The challenge is hanging on when you really want to rest. Aim to complete this effort in 15 minutes or less. Some advanced athletes may be able to go sub 10 minutes. Use a load for both movements that allows you to maintain large sets.
Scaling:
Reduce the overall volume by completing 20-30 reps for each movement. Reduce the loading of the dumbbell and medicine ball to maintain sets of 15 or more reps for intermediate athletes and 10 or more reps for beginners.
Reduce the complexity of the dumbbell snatch by performing a hang dumbbell snatch. As for the wall-ball shots, reduce the height of the target.
In case of injury or limitation, perform a single-arm dumbbell snatch on the unaffected arm. If there is an overhead limitation, perform a dumbbell clean or sumo deadlift high pull. For the wall-ball shots, perform a med-ball front squat if there is an overhead limitation or a med-ball push press if there is a squatting limitation.
Intermediate option:
2 rounds for time of:
50 alternating dumbbell snatches
50 wall-ball shots
♀ 25-lb dumbbell and 10-lb medicine ball to 9-foot target
♂ 35-lb dumbbell and 14-lb medicine ball to 10-foot target
Beginner option:
2 rounds for time of:
30 alternating dumbbell snatches
30 wall-ball shots
♀ 10-lb dumbbell and 6-lb medicine ball to 9-foot target
♂ 15-lb dumbbell and 10-lb medicine ball to 10-foot target
Coaching cues:
To maintain a better back position in the dumbbell snatch, focus on bracing your abdominals and maintaining an active shoulder as you return the dumbbell to the ground to begin the next repetition.
Resources:
The Dumbbell Snatch
The Wall-Ball Shot
Find a gym near you:
View the CrossFit map

Saturday 241207
For time:
150 burpees
150 wall-ball shots
Partition the reps as needed to complete the work as quickly as possible.
♀ 14-lb medicine ball to 9 feet
♂ 20-lb medicine ball to 10 feet
Post time to comments.
Scaling: Today’s workout is a “choose your own adventure.” Break up the reps and switch exercises in any fashion you choose. Expect the burpees to conflict with the wall-ball shots with regard to the pressing of the burpee and the throwing of the med ball. Because of this, you may consider smaller sets of each movement with more switching back and forth. Choose a loading for the wall-ball shots that allows you to complete at least 10 unbroken reps every time you pick it up. As for the burpees, breaking up 150 reps into smaller sets looks less daunting. Find a rep scheme that works for you.
Intermediate option:
For time:
120 burpees
120 wall-ball shots
Partition the reps as needed to complete the work as quickly as possible.
♀ 10-lb medicine ball to 9 feet
♂ 14-lb medicine ball to 10 feet
Beginner option:
For time:
60 burpees
60 wall-ball shots
Partition the reps as needed to complete the work as quickly as possible.
♀ 6-lb medicine ball to 9 feet
♂ 10-lb medicine ball to 10 feet
Coaching cues:
Don’t waste time getting to the floor on your burpees. Gracefully “fall” to the floor. This technique saves your arms from excessive fatigue and speeds up your burpee cycle time.
Resources:
The Burpee
The Wall-Ball Shot
Find a gym near you:
View the CrossFit map

Friday 241129
Complete as many reps as possible in 15 minutes of:
75/100-calorie row
30 box jumps
30 jumping pull-ups
30 kettlebell swings
30 lunges
30 knees-to-elbows
30 push presses
30 hip extensions
30 wall-ball shots
30 burpees
30 double-unders
♀ 20-inch box, 26-lb kettlebell, 35-lb push press, 14-lb medicine ball to 9 feet
♂ 24-inch box, 35-lb kettlebell, 45-lb push press, 20-lb medicine ball to 10 feet
Post reps to comments.
Scaling:
Today’s workout is a classic chipper-style effort. Some may recognize it as the “Dirty Thirty” with an added row to begin the workout. The goal is to make it as far through this workout as possible within the allotted time. Some may even finish the double-unders and get an opportunity to get back on the rower. However, most should aim to make it to the wall-ball shots and get as many reps as possible before time runs out. To hit this stimulus, the row should take no more than 6 minutes to complete. Every other movement after should be kept to 1:30 or less.
Intermediate option:
Complete as many reps as possible in 15 minutes of:
50/75-calorie row
30 box jumps
30 jumping pull-ups
30 kettlebell swings
30 lunges
30 knees-to-chests
30 push presses
30 hip extensions
30 wall-ball shots
30 burpees
30 double-unders
♀ 20-inch box, 26-lb kettlebell, 35-lb push press, 10-lb medicine ball to 9 feet
♂ 24-inch box, 35-lb kettlebell, 45-lb push press, 14-lb medicine ball to 10 feet
Beginner option:
Complete as many reps as possible in 15 minutes of:
35/50-calorie row
20 box step-ups
20 jumping pull-ups
20 kettlebell swings
20 lunges
20 hanging knee raises
20 push presses
20 good mornings (unweighted)
20 wall-ball shots
20 burpees
20 single-unders
♀ 12-inch box, 18-lb kettlebell, 35-lb push press, 6-lb medicine ball to 9 feet
♂ 20-inch box, 26-lb kettlebell, 45-lb push press, 10-lb medicine ball to 10 feet
Coaching cues:
In the dip of the push press, your torso should be vertical with your shoulders and hips stacked over your ankles. As you dip, think about sliding your knees forward slightly as your shoulders and hips drop straight down over your ankles.
Resources:
Rowing
The Box Jump
Jumping Pull-Up Progression
The Kettlebell Swing
The Walking Lunge
Knees-to-Elbows Progression
The Push Press
The GHD Hip Extension
The Wall-Ball Shot
The Burpee
The Double-Under
Kipping Hanging Knee Raise
The Good Morning
Find a gym near you:
View the CrossFit map
Loading...