Anatomy of Levers, Part 6: Lever Efficiency

8
ByCrossFitFebruary 17, 2019

Levers help us do work more efficiently. They help us lift more or move faster. That said, we are not built to operate with great efficiency, anatomically speaking. First- and second-class levers generally are very efficient, especially when the loads are located close to the fulcrum while efforts are further from the fulcrum (Figures A and C). The efficiency of first- and second-class levers will decrease when loads move further from the fulcrum (Figures B and D). Overall, third-class levers are the least efficient lever type (Figures E and F). The majority of muscle-joint system levers in our body are third-class levers (Figures E and F), which means that with regard to force and efforts, our anatomical levers are naturally structured to be inefficient.

lever efficiency

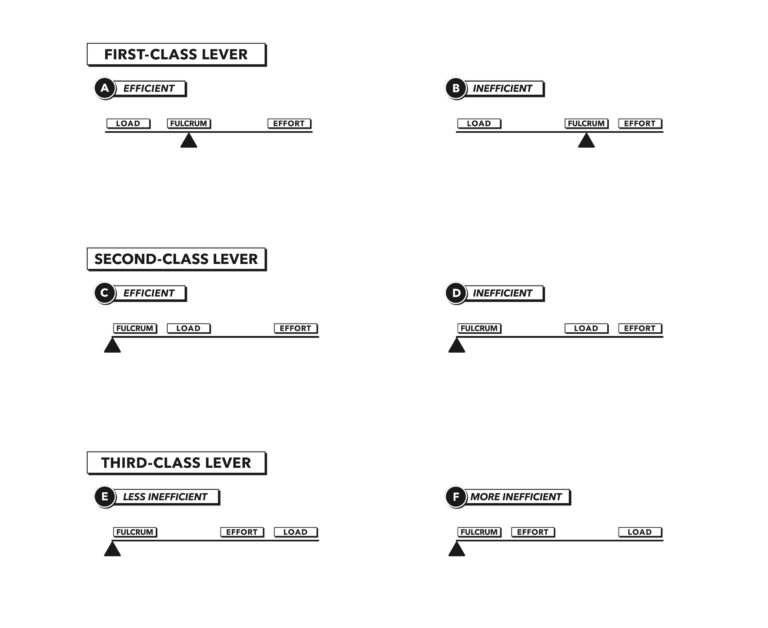
Figure 1: Lever efficiency

Despite our relatively inefficient anatomical structure, we still can manage efficiency by considering the body’s interaction with the load and environment and moving the load as close to the fulcrum as possible. Efficiency in this context is defined simply as getting the maximal work from the effort expended. For example, if we consider the hip as the fulcrum, the back as the beam, and a barbell placed across the shoulders as the load in a back squat—specifically a high-bar back squat (below left)—we observe that this lever is inefficient by definition. It is a long lever, with the load located as far from the fulcrum as possible. However, if we move the barbell lower along the back, as in the low-bar back squat, we shorten the effective length of the lever, decreasing its inefficiency. This is why you generally can lift more weight with the low-bar back squat than you can with the high-bar back squat.

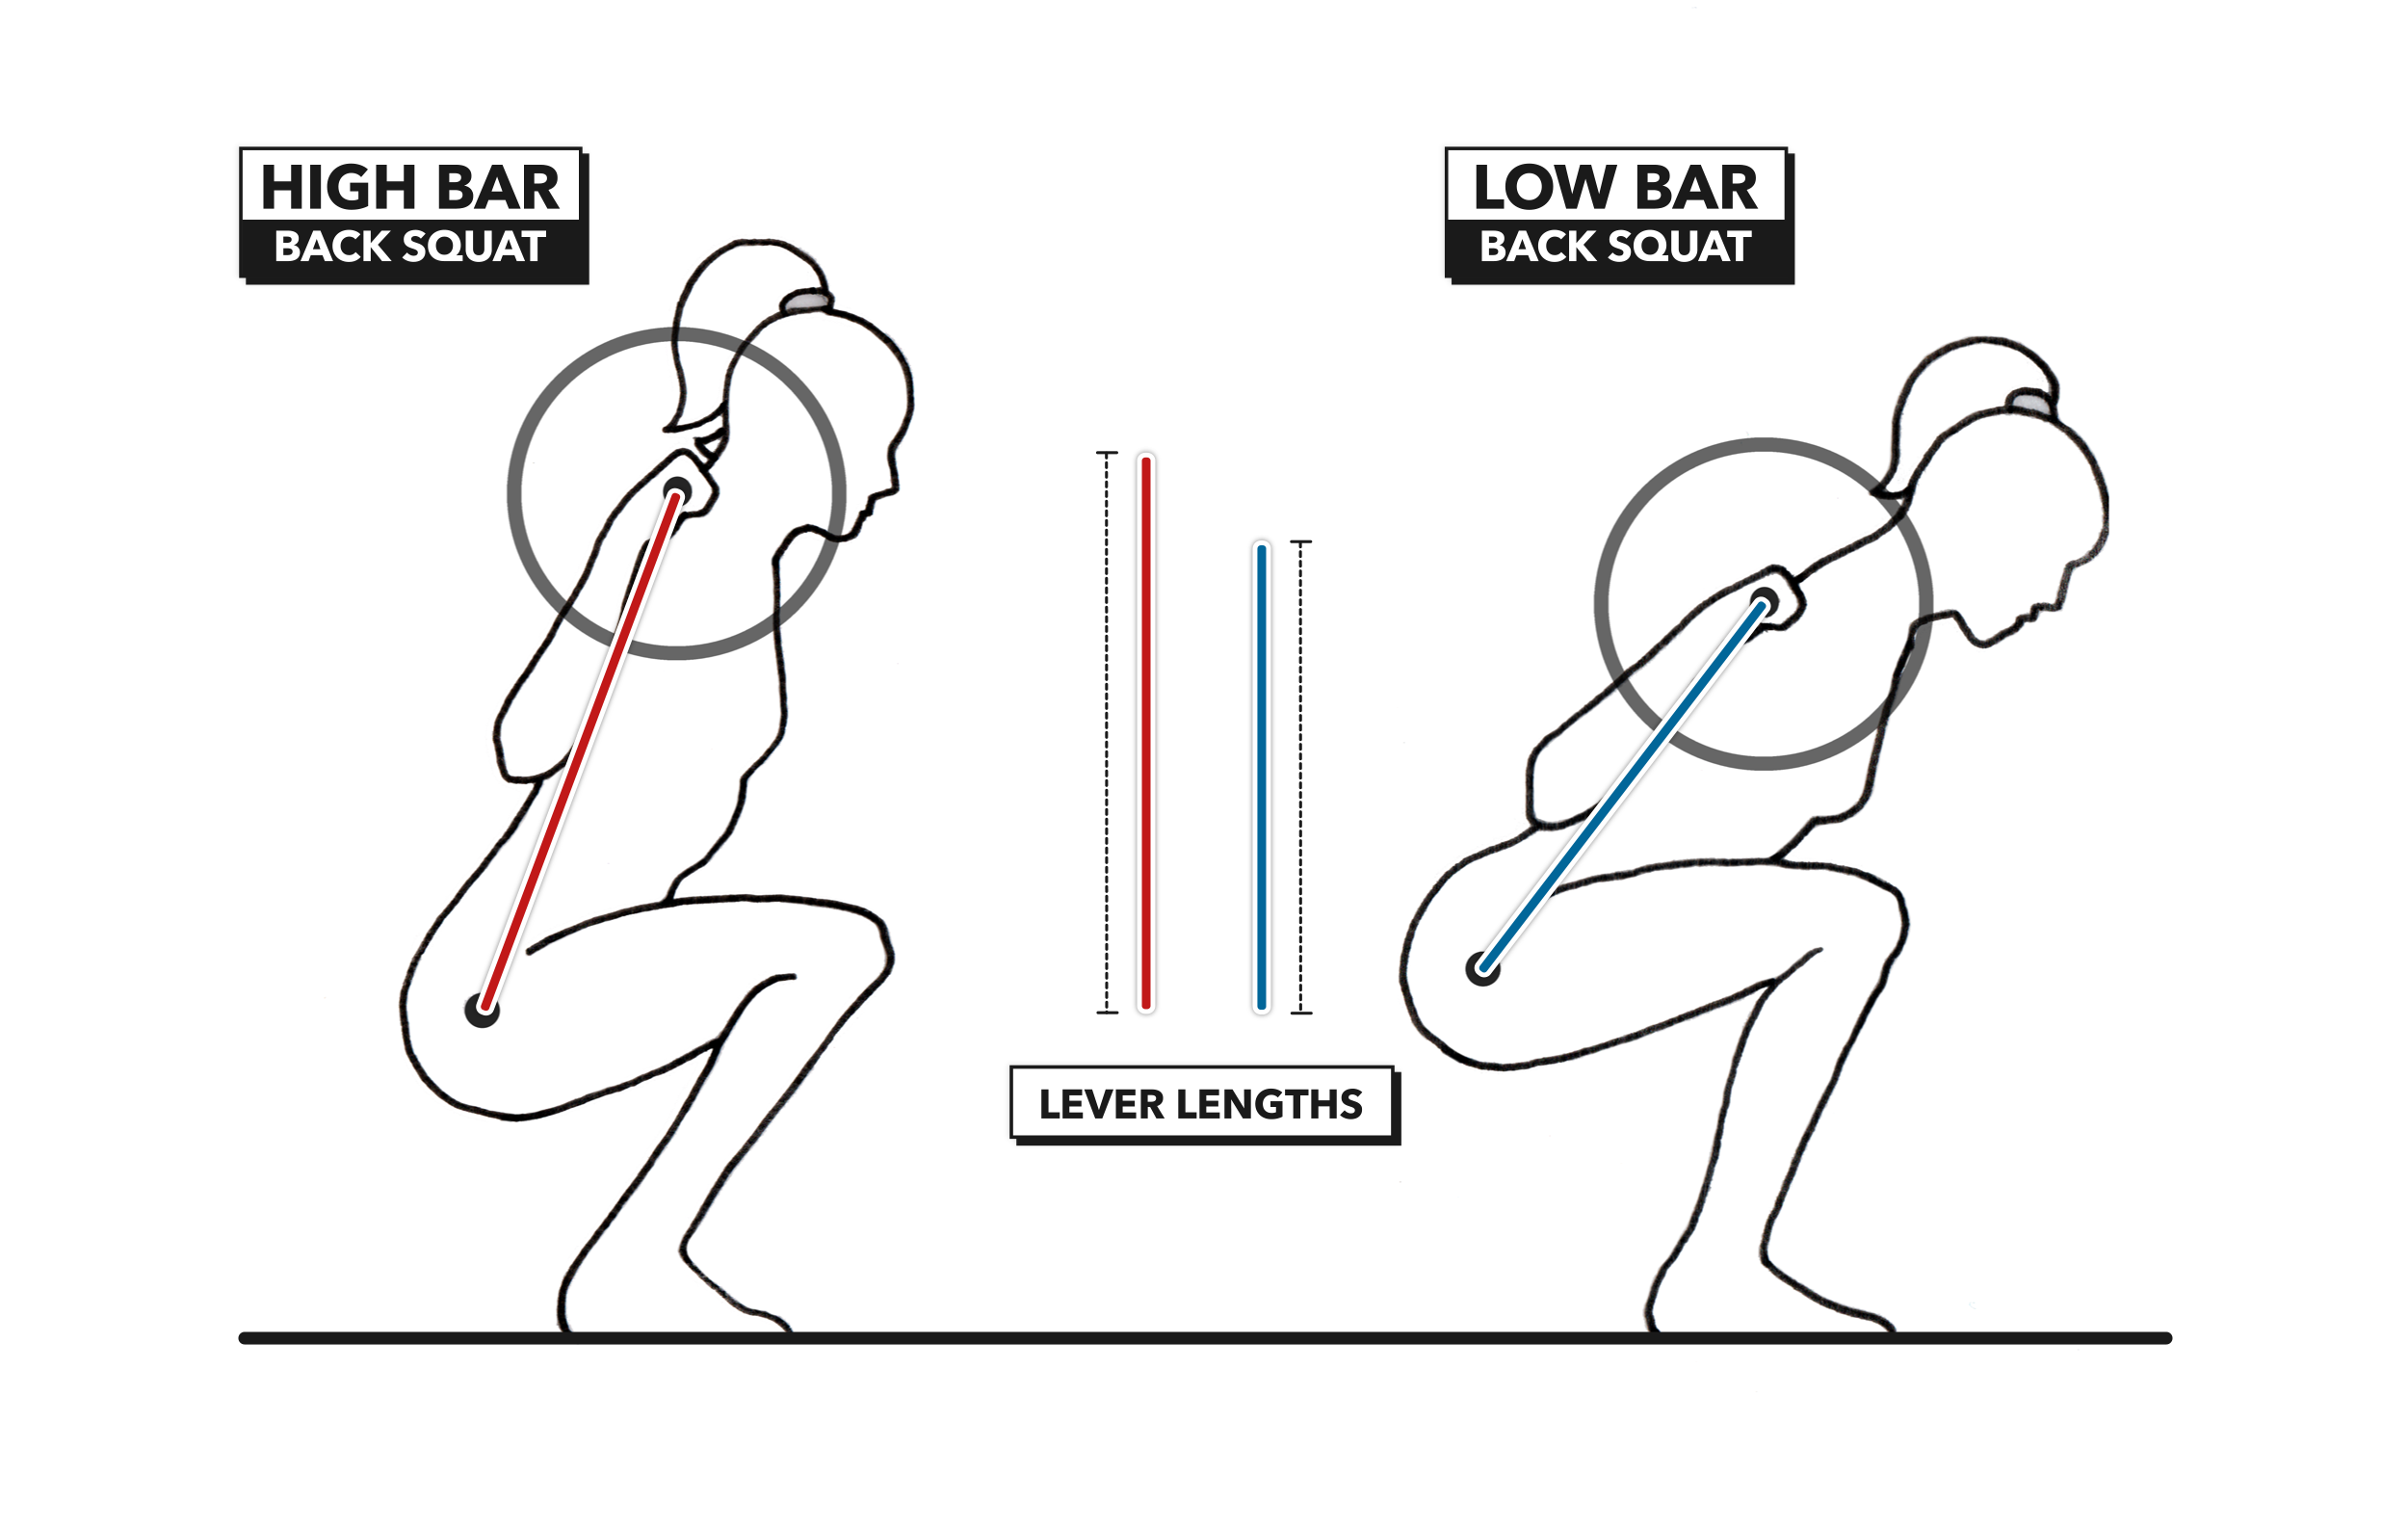
Figure 2: Shorten a lever for efficiency.

A useful application of this knowledge in coaching is in the identification of levers that do not directly contribute to moving a load toward the end target. Coaches also can use it to identify where efficiency can be gained. A perfect example can be found in the shoulder press when an athlete keeps the elbows too far forward in the rack position. This adds inefficiency through the introduction of an elbow lever as the shoulders attempt to lift the load overhead. Coaches and athletes always should be looking to identify and eliminate extraneous levers that reduce performance or limit progress toward a specific goal.


Related

Comments on Anatomy of Levers, Part 6: Lever Efficiency

8 Comments

Comment thread URL copied!
Back to 190218
Clarke Read
February 18th, 2019 at 8:51 pm
Commented on: Anatomy of Levers, Part 6: Lever Efficiency

I think the importance of the lever arm is even more clear when we take things one step further and look at the resistance throughout the motion.


As you progress through a motion, you’re able to deliver more or less torque directly opposing the weight you’re trying to move. This draws a strength curve - that is, a curve of how strong you are throughout a motion. For a dramatic example of a strength curve, think of a bicep curl - we are really weak at the start (meaning, we can exert little force to move our forearm upward), and relatively weak at the end, but stronger toward the middle. Think of this like a parabola.


That opposing force ALSO changes as you go through the motion, particularly when the resistance is generated by gravity. To go back to the bicep curl, you’re mostly moving the weight horizontally at the start of the motion, when your arm is locked out, so the amount of resistance gravity applies is relatively little. As you move the weight up, you’re trying to move it in a progressively more vertical direction, and so the resistance increases, until you pass 90 degrees and it begins to decrease again. What matters here isn't the absolute force the weight generates (which is constant in a controlled movement, unless you're using chains or bands) but the torque your muscles need to overcome around the primary active joints.


What matters to us as lifters is how well these curves match up. You strain when your strength at a given point in that curve is close to the resistance at that same point. You fail when the resistance exceeds it. To stick with the bicep curve example, if our bicep is weaker at the bottom of the motion than the resistance opposing it, we can’t move the weight, even if we could move it through the remainder. (A lot of “cheating” is our natural attempt to overcome this. Leaning back during a bicep curl? That’s trying to change the resistance curve so that instead of having to move the weight directly upward, we’re moving it partially sideways, and so the dumbbell places less torque on our elbow.)


Now, we can’t change our strength curves, at least not immediately. What we can do is change the resistance curve. And that’s where lever arms come in. If you shorten the lever between the resistance and the joint, it exerts less torque even if it has the same force (since torque = force x distance) - and so, if we shorten the distance between our weight and the joint being worked hardest by the movement, we are in effect shrinking the resistance curve. (Good technique instead changes the shape of the curve, hopefully placing the greatest resistance in the parts of the movement where we are strongest).


As Lon mentioned in his post, this gets a lot more complicated in practice because when we shorten or lengthen the lever arm, we usually need to change the path the weight and our bodies follow to compensate, and often even the muscles involved in the movement, so there are all sorts of changes to both the strength and resistance curves. But it does speak to the high-level impact of lever arms on our ability to move weight. Just think of how much easier it would be to do a bicep curl if the weight was at your mid-forearm rather than in your hand.


These diagrams might be helpful to make some of that less abstract:

https://socalstrongman.com/2017/11/30/strength-curves/

Comment URL copied!
Matthieu Dubreucq
November 25th, 2019 at 9:28 pm

Thanks for this! Very usefull

Comment URL copied!
Richie Williams
February 18th, 2019 at 3:41 pm
Commented on: Anatomy of Levers, Part 6: Lever Efficiency

10:23.... had to Scale p/ups.... very strict

Comment URL copied!
Raphael Reyers
February 18th, 2019 at 8:25 am
Commented on: Anatomy of Levers, Part 6: Lever Efficiency

Hey guys,

I am not a physicist nor mathematician but isn't the torque, working on the fulcrum (hip), a bigger one on the right picture? The force works vertical to the Ground, which makes the distance to the fulcrum longer on the right side, although the lever is Shorter (drop the lot from the bar to see the distance to the fulcrum). For that reason the left picture Looks more efficiant. To make the efficiency of a low bar position more visible, the angles in the ankle, knee and hip should be the same on both pictures, shouldn't it?


If ankle, knee and hip angles are the same, the torque working on the fulcrum would be higher, due to higher distance from lot to fulcrum.


To prevent that higher torque from the high bar position, the Torso would have to be more upright (higher hip angle) which reduces the (pre) tension in the hip extensors, right?!


Dont get me wrong, I just want a deep understanding of this in order to use it for coaching.

Comment URL copied!
Clarke Read
February 18th, 2019 at 7:51 pm

Good observation, Raphael. I'm not a trainer or physician either, but I’ve got a light engineering background and I’ve felt the benefit of a low bar back squat firsthand, so I have a couple thoughts.


While the force works vertically, what this diagram is illustrating is specifically the torque around the hip joint. While the body as a whole is standing up when you squat - that is, the total force you exert on the bar is more or less directly upward - that’s not the case on a joint-by-joint level. Think of, say, doing a wall sit holding a weight over your head. There, the horizontal component of the lever arm at the hip is virtually zero, but it still takes effort to keep your hip joint from collapsing or to straighten it. The mechanics of that are complicated - we’d probably have to draw a force diagram around the joint to really suss it out, and those quickly get hairy - but hopefully first-hand experience is convincing enough to show that it’s there.


Just as importantly, you’re correct that this static diagram doesn’t represent the lever arm throughout the whole movement. As you move through the squat, the orientation of that lever arm between the bar and the hip joint is constantly shifting, but the length of the lever arm is constant. So yes, you are correct that at specific points in the back squat movement the bar in a low-bar back squat may be generating more torque around that hip joint than in a high bar movement, but over the course of the whole movement the shorter lever arm is going to most likely make the low-bar squat more efficient. (Assuming, of course, your technique is good) You’re right that the diagram could have maybe been a little clearer in showing this.


And then, of course, there’s the complication that we’re stronger or weaker throughout the movement, and so what really matters for each given person is this efficiency at the point of failure (or near-failure). But that’s a little more idiosyncratic, and that’s where coaches come in - figuring out where a given athlete is strong or weak in each movement and basically trying to maximize efficiency where and when it counts most.


That’s a little more hand-wavy than I’d like it to be, but hopefully it provides a little bit of clarity. Thanks for trying to dig deeper into the claims being made here.

Comment URL copied!
Lon Kilgore
February 18th, 2019 at 8:16 pm

Raphael,

Very good observation.

High bar squat position reduces torque around the hip by opening that angle and closing knee angle. That’s one reason why it’s useful in people limited by low back pain/pathology. But I was simply trying to demonstrate how a modification of an exercise affects a single lever’s efficiency. Isolating on one joint in the multi-joint and multi-lever squat may have muddied the point.


As we move the bar up the back, the lever efficiency, hip to bar, goes down. If I would have drawn identical posture images (both images with high bar hip angle), the high bar position would have presented an off-balance figure ready to crash forward. We can’t maintain the same bottom angle of posture as when the bar is held low, we have to reposition back angle to handle the weight and keep the bar over mid-foot for balance. We, most trainees, intuitively don’t let that long back lever camber forward, putting the bar in advance of the toes, reflexes stop that. That required positional adaptation results in less possible work (load lifted), the outcome of inefficiency.


Lon

Comment URL copied!
Raphael Reyers
February 19th, 2019 at 11:04 am

many THX to Clarke and Lon for picking this up! I totally agree with you. With the same angles a high bar position would crash you forward AND over the total movement it is definitely less efficient.

What we, as trainees, definitely experience is the better control and tension when doing a low bar squat, especially in the lower position.

So we could say that in this very specific angle, when the lower bar position causes a longer distance from load lot to fulcrum, the better tension (kind of pre stretch of the posterior chain) coveres the higher torque at the fulcrum. In any other position, the low bar is going to be more efficient anyway.

have a nice week guys!

Comment URL copied!
Katina Thornton
February 18th, 2019 at 2:47 am
Commented on: Anatomy of Levers, Part 6: Lever Efficiency

I love that the coaches in our box emphasize lever efficiency. We need every mechanical advantage we can get.

Comment URL copied!