Flutter (Freestyle) Kicking Patterns
There are three common kicks used in modern freestyle swimming, and most competitive swimmers employ one of them or some variant. Use of a particular pattern almost completely depends on the event distance and how comfortable the swimmer is in executing a specific kicking pattern.
- Two-beat kick—In a two-beat pattern, the swimmer kicks two times per stroke cycle, or one kick for every arm stroke. In competitive swimming, it is primarily used during longer swimming events (800 m or more) in which the swimmer is more concerned with energy conservation and maintaining consistent body position throughout the swim.
- Four-beat kick—Intuitively, the swimmer kicks four times per stroke cycle, or two kicks for every arm stroke in a four-beat pattern. Typically, this kicking pattern is used less but may be optimal for some swimmers to employ in a freestyle distance between 400 and 800 m.
- Six-beat kick—The six-beat kick has evolved to become the sprinter’s weapon of choice. As the name suggests, a swimmer kicks six times per stroke cycle, or three times for every arm stroke when using the six-beat kick. This kicking pattern requires good timing and coordination as well as an enormous amount of energy. In competition, it is used for the 50-, 100- and sometimes 200-m freestyle events.
Common Faults
Excessive flexing of the legs is a fault in the flutter kick, in which the knees should bend, but only as much as is absolutely required to generate a propulsive kick. A novice mistake, excessive flexing is the swimming version of a classic core-to-extremity violation in CrossFit. Flexing the legs at the knee shortens the lever action a swimmer needs to generate force at the ankles. This greatly reduces the effectiveness of the stretch reflex that generates the ankle whip, and it results in an overall weaker kick. Excessive flexion also relies heavily on the push-pull action of the quadriceps and hamstrings (very large muscle groups) instead of using the hip flexors (relatively small muscles). Using very large muscles ineffectively is a monumental waste of energy.
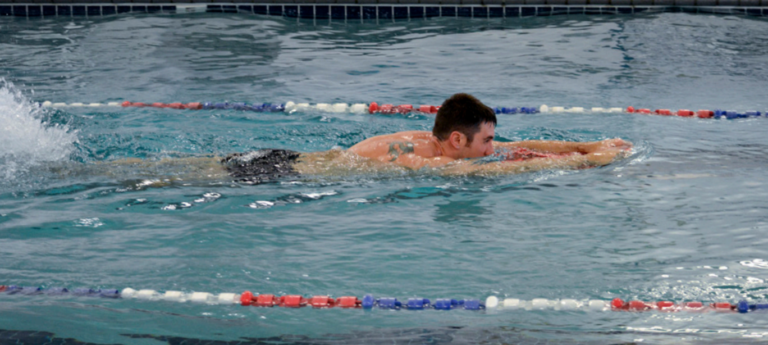
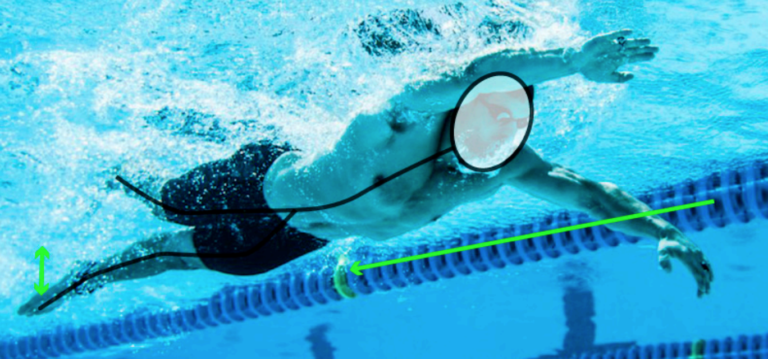
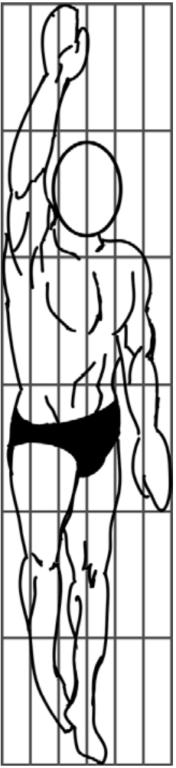
Excessively wide or deep kicking can also cause problems. Imagine the body is inserted into a torpedo tube. An effective flutter kick should remain within the confines of that tube as much as possible. A flutter kick that is too wide or deep generates unnecessary drag and is not optimal for generating forward propulsion.
Kicking Drills and Corrections
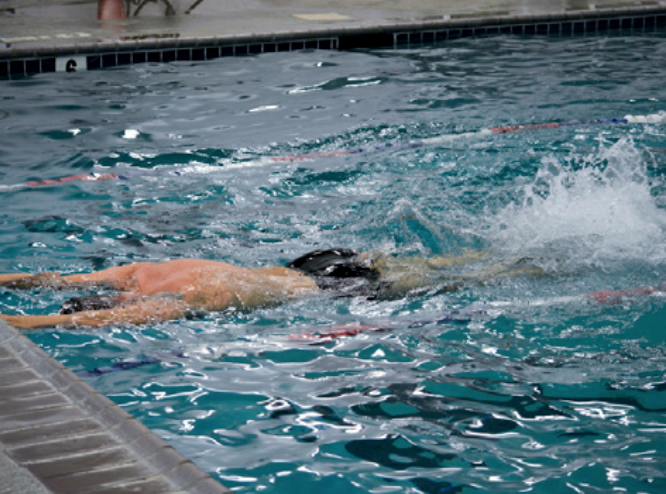
The kickboard is a powerful tool for focusing and developing any kicking movements in swimming. Kickboards come in a variety of shapes and sizes that can be used for different things. Larger kickboards require less core stability and body awareness to use, which may be acceptable for focused work on the kick. On the other hand, smaller boards provide less torso support and more closely mimic the conditions and body position of actual swimming. Both can be used to improve the kick. Programming for swimming is beyond the scope of this article, but the kickboard can be employed in the same variety of distances and intervals as swimming without the board.
Kicking with a board to support the upper body is a powerful tool for isolating the kick.
The Arm Stroke
Entry, Reach and Catch
One way to think about swimming freestyle, or any stroke for that matter, is to consider the Pose Method of running. Certain positions, or poses, must be replicated exactly in order to achieve the greatest efficiency for a given stroke. What happens in between poses is merely transition from one pose to the next. The freestyle arm stroke can be thought of in this manner.
The hand should enter the water middle finger first at a slight angle toward the surface of the water, and it should be held with the fingers and thumb in line and close together. A firm wrist and firm, flat hand make for the best pulling surface. When we watch top athletes, we see daylight between their fingers. The reach and catch portion of the stroke happen next.
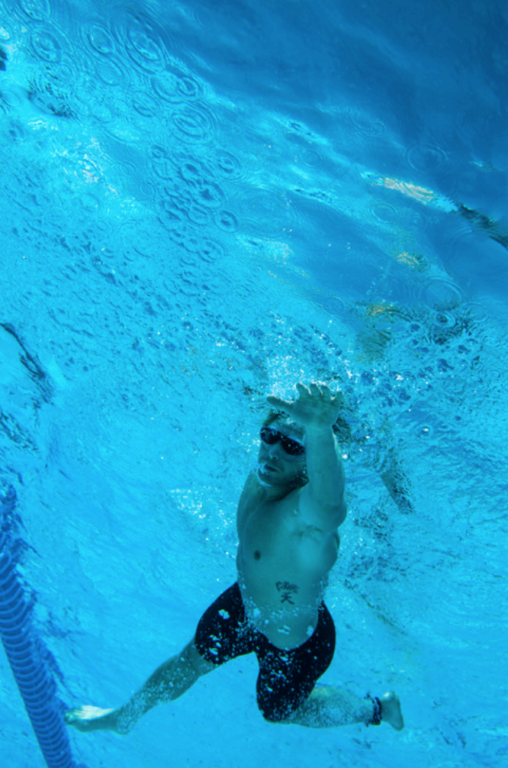
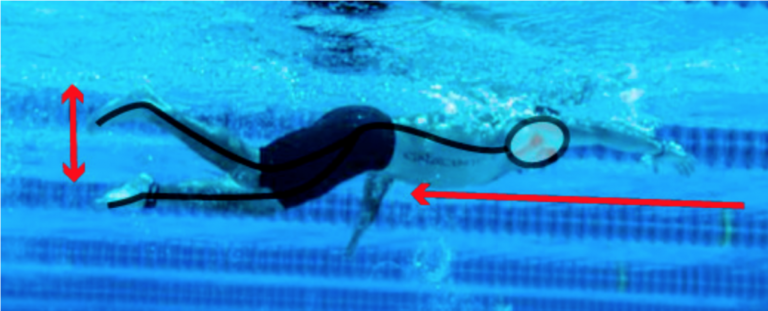
With the hand and arm now in the water, shrug the shoulder of the forward-reaching arm and squeeze the cheek against the shoulder. This will help reduce drag and obtain proper reach. Ensuring the proper rotation of the hips and torso will maximize stroke length. Referring to Figure 2, the pose finds the right arm fully outstretched overhead with the right hip and right side of the torso rotated toward the bottom of the pool, while the left arm is recovering along the torso. Focus on maintaining as narrow a profile as possible. Going back to drag and efficiency, the adage “be a needle, not a truck” was pounded into my head as a young swimmer.
Imagine you are swimming in a tube. Excessively wide leg positions create drag.
Now comes the catch phase of the stroke, which happens 3-6 in. below the surface of the water. The wrist and arm should bend such that the swimmer mimics the motion of reaching over the top of a barrel to throw it behind him. Naturally, this will force the elbow into a high position where the potential leverage is greatest. This arm position will also allow the palm of the hand to be more or less perpendicular to the bottom of the pool.
Overdeveloped back muscles are some of the most distinguishing features of someone who is clearly a swimmer. This adaptation is a result of continually engaging this muscle group through internal rotation of the shoulder joint in order to “scoop the barrel,” so to speak. It’s important to note that the resulting high-elbow position, from reaching over this invisible barrel, is present in any of the competitive strokes, not just freestyle. The core-to-extremity mantra ties in very nicely as well, as the power from the arm stroke originates in the core (the middle and upper back) musculature. There are two crucial aspects of the arm stroke to remember:
- Maintaining consistent pressure on the water throughout the arm stroke while drawing the hand near the body’s centerline.
- Keeping a high-elbow position where the elbow is always above the hand during the pull.
The vertical component of the freestyle arm stroke is also critical. The deepest part of the freestyle arm stroke will typically be from the catch until the hand reaches the waistline. At this point the stroking arm and hand continue to force water backward until the upper arm and then gradually the lower arm and hand exit the water to begin the recovery phase. Again, the critical point here is the high-elbow position, which optimizes leverage on the water. A great example of high-elbow position throughout the stroke is Chinese swimmer Sun Yang. His elbow stays near the surface of the water throughout almost the entirety of each pull.
Recovery
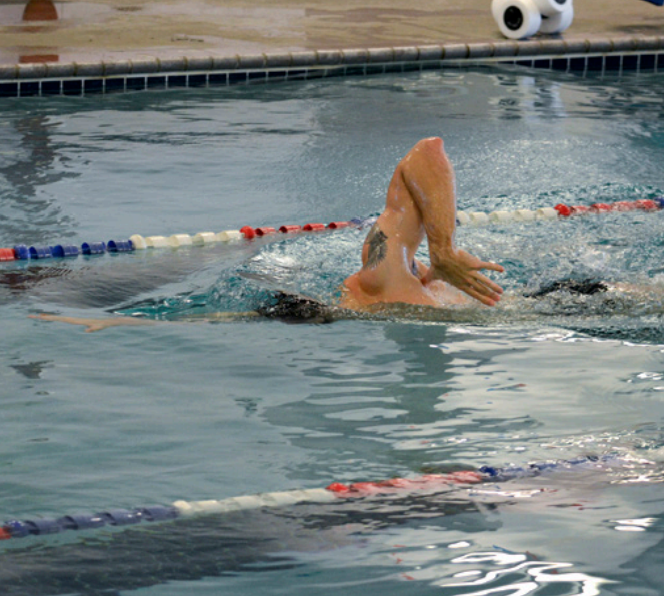
Recovery begins when the stroking arm exits the water. The goal in recovery is to transition to the next stroke cycle as efficiently or quickly as possible depending on the event. The basic premise is to relax the arms and shoulders to allow a smooth transition between strokes. This varies greatly from swimmer to swimmer.
Defining a proper arm-stroke recovery is a hotly debated topic in swimming. There are many different styles of arm recovery, and there are many world-class swimmers who have used unconventional freestyle stroke recovery. A great illustration of this is a comparison of Australian swimmer Michael Klim’s windmill-like 200-meter freestyle at the 1998 world championships with Michael Phelps’ stroke style during the 2012 Olympics. Both athletes have vastly different techniques, but both are world class. The bottom line is that stroke mechanics outside the water matter significantly less than they do when the hands are below the surface.
The recovery phase of the stroke should be performed in a manner that is most comfortable for the swimmer. In addition, any recovery style that introduces additional drag can be detrimental to forward momentum.
Common Faults
Early recovery is akin to not opening the hips completely in Olympic weightlifting and will result in less than optimal power output with the arm stroke. This fault most commonly happens during sprint events in which swimmers often focus on increasing their arm-stroke turnover rate to increase speed in lieu of having complete strokes. In this case, the arm will exit the water with excessive bend at the elbow around the waistline. The drill to correct this is very simple and is known as the “finger-flick drill.” The swimmer focuses specifically on making sure that his middle fingers fling water behind him as he swims freestyle.
Swimming flat is another issue. The swimmer will have a very difficult time recovering the arm stroke while the torso is completely parallel along the axial plane with the surface of the water. This error can be common in young or new swimmers and is the result of a lack of body roll. Due to this error, the swimmer will not establish optimal stroke length and will probably introduce additional drag from an inefficient recovery. To correct the problem, encourage the athlete to rotate the hips and torso with every stroke while maintaining the head position. Swimming on one side or the other for several strokes and then rotating every two or three stroke cycles can also help alleviate the problem. Emphasis on arm reach and shoulder shrug with the extended arm can be helpful as well.
Arm-Stroke Drills and Corrections
In the zipper drill, the thumb is drawn all the way up to the armpit before resuming normal stroke recovery. This emphasizes shoulder roll and may be helpful for athletes who seem to flail the arms inefficiently outside the water.
Sculling can be used to develop the catch for any of the competitive strokes. It is notably helpful in developing the out-sweep and in-sweep of the breaststroke. This can be done in two positions: the first is with the swimmer face down in the water with arms outstretched to the front at the surface of the water. The swimmer’s head can be tilted up out of the water provided he is strong enough to do this. Essentially, the scull is very similar to the movement used to wade in water. The hands should move back and forth simultaneously in 8-to-12-in. sweeps below the surface of the water, rotating toward the direction they are traveling. This drill also reinforces hand position and tilt (approximately 45-60 degrees from horizontal) as a less-than-optimal position will be both inefficient and lack power. The kick during this drill should be minimal if present at all—just enough to maintain buoyancy. Distances used for this drill are normally limited to 25-50 meters.
Another way to do this drill is to have the swimmer on his back with the feet facing either forward or backward. With the feet forward, this is a very challenging drill but will be very effective at developing the catch.
The zipper drill can be used to improve or fix swimmers with poor arm recovery leading to stroke inefficiencies and drag. As the body rolls with each stroke, draw the thumb along the side of the body prior to placing the hand in the water for each successive stroke. The motion helps emphasize a high-elbow position during recovery and also helps guide the recovering arm in a straight line along the body (vs. an arguably more inefficient stroke in which the arms recover wide of the body’s centerline).
If a swimmer has less-than-optimal stroke length—i.e., does not reach full extension on each stroke—a catch-up stroke can be applied in order to correct the fault. In this drill, swimmers will start with one arm outstretched and will not begin the pull with the extended arm until both hands meet in front of the body at the surface of the water. Emphasis is on hand entry with the middle finger entering the water first. Care should be taken such that the swimmer focuses on not slapping the water with every stroke.
Swimming on one side or the other can help a swimmer who struggles with body-roll mechanics or if there is a need to improve overall stroke length. To perform side-swimming, have the swimmer extend one arm and focus on keeping that arm out in front as though it had just entered the water. The forward shoulder should be shrugged. The swimmer should then only stroke with the other arm, staying on the side at an angle to the horizontal plane of the water. An option to work on the mechanics of the roll itself is to have the swimmer switch sides every three or four strokes.
Timing the Stroke, Kick and Breathing
One of the most difficult aspects of swimming any stroke is synchronizing all the moving parts. Elite swimmers dedicate years to perfecting timing and developing their feel for the water. In general, this feel is gained by spending time working on specific technique drills and breathing patterns. Some things will come intuitively, while others will require coach intervention and correction. Practice—along with the drills highlighted above—can be used to correct some timing problems. The side-swimming and catch-up-stroke drills are particularly helpful.
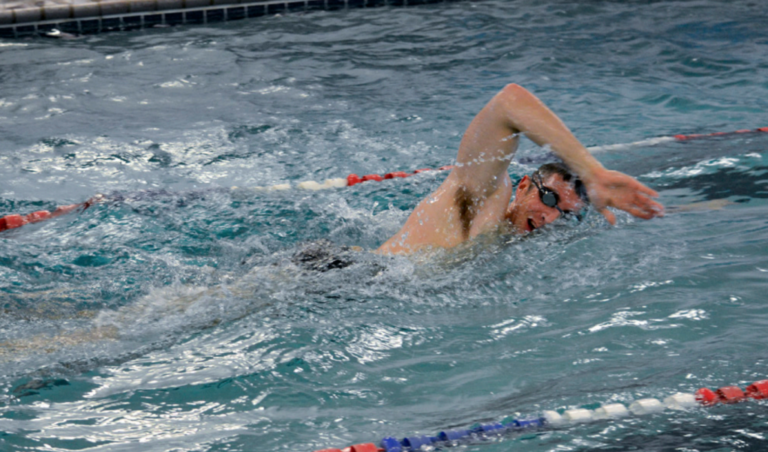
The mouth only needs to clear the surface of the water slightly to facilitate effective breathing technique.
Breathing patterns in swimming are not unique to this sport alone, and breathing patterns in general are often overlooked as a way to improve flow and efficiency for every modality in CrossFit. With swimming, breathing gains much more attention simply because your face is in the water. Aside from the obvious need for oxygen, there can also be some gamesmanship in selecting breathing patterns, with race distance the prime concern.
It is a common practice to work specifically on breathing patterns in a workout and then employ one a swimmer is comfortable with in a race. For a singular 50-m freestyle event, a sprint, athletes often opt to go with one of three breathing patterns: no-breath, one breath, or two breaths. For all other distances, including those of 50s on repeat intervals, one of three breathing patterns is common: every stroke cycle, every three strokes, or every other stroke cycle.
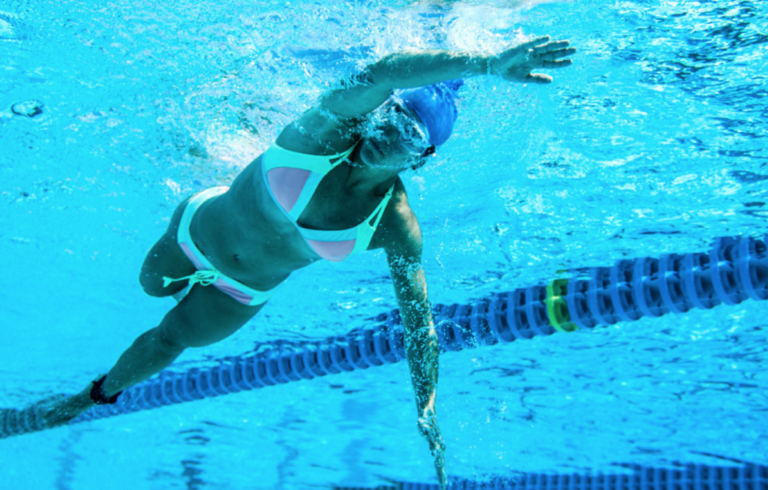
Opposite of the position seen here, the athlete’s right hip should dip toward the bottom of the pool when the right arm is extended overhead. Doing so will maximize stroke length.
Breaths should happen on the side of the recovering arm as it exits the water. When breathing, the head only needs to be rotated slightly, and only a portion of the mouth must be out of the water in order to facilitate a breath of air. While the head is submerged, the athlete should slowly blow bubbles out of his nose and/or mouth to reduce buildup of carbon dioxide.
Drill for Skill and Speed
Swimming, as with every other aspect of fitness, requires time and dedication to perfect technique. As we saw at the CrossFit Games in 2013, many athletes would benefit from some basic training to improve speed and efficiency in the water. It is my hope that this article will introduce coaches and athletes to swimming fundamentals, and I also hope to share CrossFit with the competitive-swimming community, and vice versa.
About the Author: Adam Palmer is an active-duty Air Force officer, CrossFit Level 1 certificate holder and coach at Praetorian CrossFit in Kathleen, Ga. Prior to discovering CrossFit in 2008, he competed at the NCAA Division 1 level and was a United States Swimming club athlete for more than 16 years.
Images: Ruby Wolff / Scott Wallace / Adam Palmer / CrossFit Journal
Click here to download the original PDF.
Comments on From the Archive: Torpedo School
4 Comments
Agree, an excellent coaching summary. I remember that swim workout in the 2013 Games where Jordan was head and shoulders above the rest of the field. Watching him was a joy, the rest of the field…not so much.
Great article explaining what ares to look at and correct. A session with a swim coach can really help make a difference, esp. with a video review.
Really liked reading this, thank you! Keen to try this out the next swim sesh!
A great summary of the principles of swimming efficiently and effectively. As a swim and CrossFit coach, swimming is certainly an area where athletes can make great gains by mastering the basics.