Double, Double Toil and Trouble

1
ByHilary Achauer January 1, 2015

Originally published January 2015 in The CrossFit Journal.


On the surface, the double-under is simple. Grab a jump rope and let it pass under your feet twice each time you jump.

When double-unders go well, they are a thing of beauty. The rope is a blur as the athlete bounces up and down, relaxed and composed, the calm in the eye of a storm.

When double-unders fall apart, it’s painful to watch—and experience. The rope whips the athlete in the legs. The rope catches under the athlete’s feet. The hands and body seem to move at cross purposes. The athlete gets increasingly frustrated, and the situation gets worse. The scenario usually ends with a rope getting thrown across the gym. Often, there are tears.

The movement seems simple, but so much can go wrong. Double-unders require perfect timing and consistency. The athlete must stay relaxed and fluid, which is not easy when the clock is counting down and the stupid rope is whipping you.

Dave Newman has witnessed every type of double-under mistake. With his team, the RX Smart Gear owner and double-under expert leads workshops across the country. In an effort to help people identify their mistakes and learn double-unders quickly and smoothly, Newman has broken the movement into three primary components: bounding, rotational mechanics and timing. He’s created drills to work on each component and cues to fix the most common double-under errors.

With a little help, your double-unders will become a thing of beauty, and you can then move on to the next frontier: triple-unders.

Bounding

Ideally, the athlete assumes a position in which the hands are 4 to 6 inches from the hip crease. This positioning should be maintained for all reps.

When an athlete first attempts a double-under, his instinct is to whip the rope around as quickly as possible in a desperate attempt to get the rope to pass under his feet twice before he hits the ground.

This is not the best strategy. A quickly moving rope does not guarantee a successful double-under, especially for an athlete who is just learning. The rope doesn’t have to move quicker to turn a single into a double; the athlete has to jump higher. To make the jumps efficient and smooth, Newman says the body should be like a pogo stick, with the athlete staying on his toes. According to Newman, the height of the jump is the most important aspect of the double-under.

“The higher you get off the ground, the more chance you have for success,” Newman said.

The analogy Newman and his team give is Neil Armstrong doing double-unders on the moon. Picture Armstrong floating in the air. How easy would it be to keep rotating the rope? The longer you are in the air, the more you are able to slow the speed of the rope. A slower rope is more relaxing, leaving you fresh for the other movements in the workout. According to Newman, slowing the rope down also helps bring other senses into play, allowing the athlete to see the rope and perfect his timing.

“You also lose the fear of whipping yourself,” Newman said. “That (fear) creates a flinch reflex. People are flinching because they either really want to make it or they are worried about getting whipped.”

If the hands are too far forward or too far back, skipping will be inefficient. The athlete should be able to see the hands working at the hips in peripheral vision.

Before an athlete begins bounding, Newman and his team work on posture. The ideal posture for double-unders is characterized by a very upright, straight body. Tuck in the hips, engage the glutes and quads, and keep the core tight. Finally, make sure the back of your neck is long and your chin is tucked in.

In a double-under, the calves do most of the work. Imagine your body is a pogo stick, and your calves are the spring.

“That’s where we see the biggest problem,” Newman said. “People do these really high, loopy singles with this big arm rotation, and then when they are ready to go for a double, all of sudden they forget about getting off the ground and jerk the rope into a tight little rotation, and the timing is off and they catch themselves.”

When you transition to double-unders, keep the heels as high off the ground as possible and spring off your toes. Newman suggests athletes imagine they’re wearing high heels.

“We want to spring, not absorb. If you let your heels sink down, you are absorbing, and that changes your timing,” Newman said.

Bounding Drills

1. Grab a partner or set up a video camera or phone to record. Start by bounding as if doing low singles, and then bound higher as if doing double-unders (don’t use a rope). Pick a reference point on the horizon, and try to go above that line or mark when switching to double-unders. There should be a noticeable difference between the height of the low and high jumps. Next, try this drill with a jump rope.

2. To practice bounding off your toes, have a friend stand on a box and hold a stick or a PVC pipe over your head at about the height you need for a double-under. Practice bounding up and down (without a rope) and touching your head to the stick each time (see photo).

In this drill, try to stay as tall as you can, making your body as long as possible. Hold the stick at different heights for your partner, so he or she can see the difference between a low single and a high double. Work on achieving a slight knee flex with very engaged quads when jumping higher. Use the flex to spring off your toes, and keep your feet together.


Rotational Mechanics

After bounding, the next essential piece of the double-under is what Newman calls “rotational mechanics,” a term that refers to the positioning of the arms and hands. Poor hand positioning is one of the biggest causes of missed double-unders. As people get tired, their hands drift out from their body, which changes the shape of the rope.

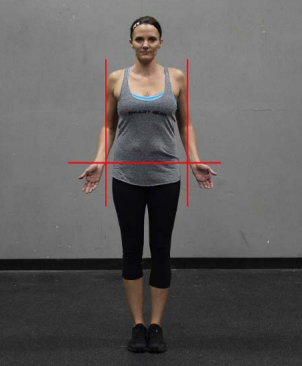
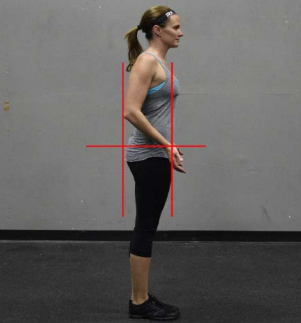
Ideally, the elbows should be by the athlete’s side and drawn back, with the palms forward. There should be about 4 to 6 inches between the hip crease and the wrist. If you were wearing a belt buckle—which is usually in the middle between the hip crease and hip bone—your wrists would be in line with the belt buckle.

“Without looking down, just using your peripheral vision, you should just see your hands wiggling,” Newman said.

“When you lose (sight of ) one or both hands, then your hands are out of position. When your hands are out of position, the spacing between you and the rope has just changed,” he said.

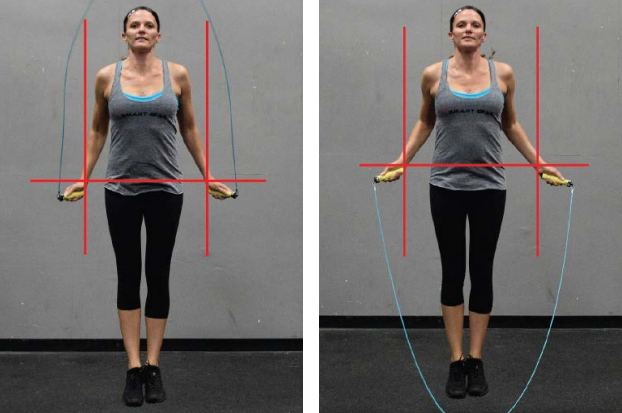
If your hands are too tight against your body, it creates a narrow rope shape. If the hands go too wide, the rope shortens. The ideal is a happy medium.

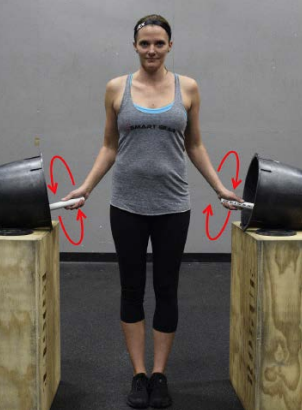
By using only the wrists to trace the PVC around the insides of the buckets, athletes can learn the correct rotational mechanics for double-unders.

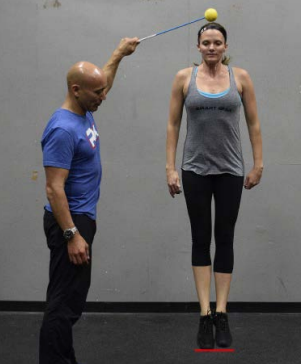
The athlete should look at a spot on the ground about 10 to 15 feet in the distance. The goal is to have the rope hit the same spot each time, about 12 inches in front of your toes.

If your hands are too far forward, the rope is going to hit the ground farther out from the body, which causes the rope to rebound too quickly, Newman said.

“Those people are usually tuck jumpers—they have to get their feet out of the way,” Newman said.

“When their hands are too far out in front of them, they see the rope out in front of them and the rope keeps catching their feet, so they start raising their feet up to miss it. It’s counterintuitive for them to do the right thing, which is to pull the rope in closer to them so that the bottom-out point on the ground is closer to their feet,” he said.

Newman said he also sees people who “operate from the back seat.” These people jump with their hands too far back. In this case, the athlete uses more back and shoulder muscles, which is tiring, and the bottom-out point is too close to their toes.

The next element of rotational mechanics is wrist rotation.

“We want the wrist to do the swiveling,” Newman said. That means the wrist is disengaged from the arm. When the wrist is the swivel, the forearms and the grip can be relaxed.

“I can’t clench my fingers and have a really loose wrist,” Newman said. “If you lock down your wrist, that will promote a shoulder turn, which is not good.”

Newman said the movement is a snapping motion, like the one you’d do if you washed your hands and couldn’t find a towel. The snapping motion you’d use to dry your hands is the same type of movement you want in a double-under. The only difference is you are turning that snapping motion into a rotation. When it comes to rotational mechanics, the type of rope does make a difference.

Newman thinks a heavier rope helps the athlete feel the rhythm of the double-under.

“I don’t think beginners should use speed ropes,” Newman said. “They need to slow things down.”

Once the rope slows down, the athlete can make sure he is bounding off the toes and maintaining the correct hand positioning—from the first to the 50th double-under.

Rotational-Mechanics Drill

To learn to feel the correct isolated wrist movement, position a 5-gallon bucket on each side of the athlete. Each bucket should be on its side and propped up on boxes to sit at waist level. The athlete holds a 2-foot PVC pipe in each hand and tries to paint the insides of the buckets in a smooth, continuous movement using only the wrists. Position the boxes and buckets to create correct posture, and ensure the end of the PVC is just touching the inside of the bucket. It’s surprisingly difficult to make a smooth, round shape.

“People will start going ‘clank, clank, clank, clank’” as they bang the stick into the bucket, Newman said. The goal is to relax and release your wrist, letting the stick make a full circle.


Timing

The final piece of a double-under is timing—when to jump. Just like the Olympic lifts, double-unders require patience.

According to Newman, most people jump too soon, when they first see the rope. The best time to jump is right after the rope passes below the knee. As Newman explained, the rope has farther to travel than your body. It has a 360-degree orbit to make around the body, and the athlete only has to move up about 4 inches. This means it’s essential to be patient and wait for rope. You can start prepping your body by bending your knees and loading up, but the minute your feet leave the ground, the rope should be passing under your body.

Note the parabolic rope shape created by the correct hand position. Moving the hands in or out will alter this shape and change the timing required to complete the rep.

“That’s one of the biggest missteps (people make),” Newman said. “They don’t know when to jump. They equate their hand motion with jumping. The minute they start moving their hands, they think it’s time to jump.”

He added: “If the timing is correct, half of the doubleunder—that first rotation—is done the very instant you leave the ground. And then the second rotation happens and finishes before you even hit the apex of your jump. So the double-under is really done on the way up,” he said.

For this reason, Newman likes to count as the athlete is on the way up when judging double-unders in a competition. If the rope doesn’t catch on the athlete’s foot, he counts it as a good rep each time they leave the ground. If the rope catches and the athlete stops, he doesn’t count the rep.

Thinking about timing is a good strategy if you find yourself repeatedly stepping on the rope in the middle of a workout. Stop for a second, take a deep breath and start again, but try to slow everything down. You can speed up once you’re in the double-under groove, but take some time to establish a slow, controlled rhythm, keeping your body still, bounding off your toes and rotating the handles with your wrists.

Timing Drills

1. To ensure your timing is consistent, Newman recommends alternating between 10 singles and 10 double-unders.

“If you can do that smoothly, it means you have good control over your rope speed and pace,” Newman said.

He is not a proponent of alternating between one single and one double-under because he thinks it reinforces a habit of switching from high to low jumping rather than getting the flow of bounding high for double-unders.

“The minute somebody is turning one double-under, we immediately try to get them turning multiples,” Newman said.

2. Another timing drill is try to do the slowest double-under you can possibly achieve. This will allow you to really understand the timing of the movement, helping you feel how it’s not just about flinging the rope around as quickly as possible. To do this, jump as high as you can. You can even break form and bend your knees, just slow the whole movement down. Turn the rope continuously but slowly.

“You’re flirting with your tolerances,” Newman said. “How slow can I go? How fast can I go?”


Triple-unders

In this drill, a coach can help an athlete find the correct jumping height. Once the athlete hits the requisite height regularly, double-unders will become more consistent.

Once an athlete can do 50 or 100 double-unders with ease, the next challenge is triple-unders. Just like the transition from singles to doubles, Newman said the secret to going from a double-under to a triple-under is elevation. It’s not about moving the rope faster.

The only thing that might change in a triple-under is a slight tuck of the feet, Newman said—not a dramatic donkey kick but a small tuck, about the amount of knee bend you’d use for the dip in a push jerk.

It’s crucial not to change your hand position when attempting a triple-under. People are tempted to crank the rope around, but Newman said doing so can pull your hands out of position and shorten the rope.

Before attempting a triple, try exaggerating your jump on the double-under. Jump higher than you need to while keeping the hands close to the body and in your peripheral vision. Once you feel comfortable with a higher jump, try a triple-under, pulling your feet in slightly at the end if you need a little extra room for that third rotation. The first two rotations of the rope happen while you are on your way up, and the third should occur just as you are coming down.

In order to connect triple-unders, land with your legs at full extension, not in a quarter squat. This will allow you to bound off your toes and be more explosive for the next triple-under.

“Singles should look like doubles should look like triples,” Newman said. “You’re just higher in the air for each one.”

Recovery on a Rope

You’ll know you’ve mastered the double-under when you can consistently do 50 in 30 seconds and 100 in 60 seconds without breaking a sweat, Newman said.

“Look, I don’t care if you can do 10,000 double-unders,” Newman said. “It’s really 50 and 100. Know you can confidently get through those, maybe with one break, and know how long it takes you.”

In the 2014 CrossFit Games, the first event on Friday was Triple 3: a 3,000-m row, 300 double-unders and a 3-mile run. Newman remembers Julie Foucher was one of the last women off the rower. She moved on to the doubleunders and was able to make up time by completing them in sets of 100, 100, 50 and 50. She made up even more time on the run and took sixth.

Once you’ve gotten the hang of skipping, “Every other movement is harder than a double-under,” Newman said.

To improve your double-unders, work on perfecting your bounding, rotational mechanics and timing.

And make friends with your rope.

About the Author

Hilary Achauer is a freelance writer and editor specializing in health and wellness content. In addition to writing articles, online content, blogs and newsletters, Hilary writes for the CrossFit Journal.