Originally published in The CrossFit Journal, 2009.
Climbing ropes have long been a staple of CrossFit and military training programs.
Rope dates back thousands of years, almost certainly predating the invention of the wheel, making it one of the first tools of prehistoric man. The ability to climb has often been the difference between life and death, success and failure.
Climbing also has a long tradition of providing a great workout for the grip and pulling muscles. Climbing ropes offer a tremendous functional workout, whether used as part of an obstacle course or WOD or in a tug-of-war contest. Rope climbing was even an event in the first several Olympic Games, with the competition being a timed ascent without the use of legs to a height of up to 14 meters.
Despite the obvious benefits of thick rope work, many CrossFit gyms do not have climbing ropes. In some gyms that do, I’ve heard complaints about the cost and reliability of the equipment. In 2004, CrossFit HQ narrowly avoided a serious injury when the splice on their commercially purchased climbing rope came undone, sending the trainee tumbling to the ground.
In many CrossFit affiliates, the owners have spliced their own ropes with mixed results. The main complaint with splicing the rope is that, besides the risk of an amateurish splice coming undone, the rope becomes increasingly thick at the top for an inconsistent and sometimes untenable gripping surface. This article offers a costeffective do-it-yourself (DIY) solution for making your own climbing rope—and we’ll avoid splicing altogether.
What You’ll Need: Sizing the Rope and Buying Supplies
The key to this project is taking readily available, inexpensive rope and braiding it into a thicker rope suitable for climbing. We’ll take four long strands of rope and use what is called an “eight-strand square braid.” The neat trick is that by doubling up the four strands, you create a loop at the top that can be used to secure the rope—no splice needed.
Your investment is time rather than money. You can get everything you need for a rope for between $10 and $20.
The default length and thickness of the rope for this project will be 9-15 feet long and 1.5 inches thick, with a cost of between $10 and $20. If that fits your needs, then a quick trip to your local hardware store is all you require. If you want a longer or a thicker rope, the cost, complexity and time needed to finish this project will go up, but not unmanageably.
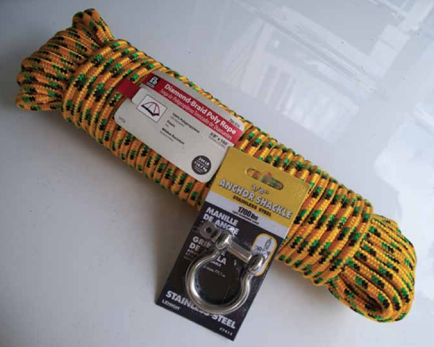
The rope to get is 3/8-inch braided polypropylene, commonly sold in prepackaged 100-foot lengths for about $10. Figure that each of the four strands used in the braid needs to be about triple the length of the finished product. A 100-foot package will braid into approximately 9 feet of climbing rope. Two 100-foot packages will result in a 15- or 16-foot climbing rope.
If you buy more than one package, get different colors. This will make keeping track of the braiding process much easier, and the end result will have a visually pleasing pattern. Kids in particular love the brightly colored climbing ropes. That said, don’t get yellow hollow-core poly rope—even though it’s cheap—because it has too much stretch.
Bear in mind that braiding becomes exponentially faster as the rope gets shorter. A braiding project more than 20 feet long is for people with way too much time on their hands and in desperate need of a hobby. A 9-foot rope might take a third as much time as a 15-foot rope. Also note that at the local hardware stores it’s only economical to buy rope in 50- and 100-foot increments. Rope by the foot is much cheaper online.
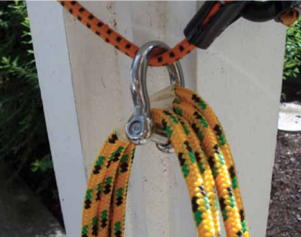
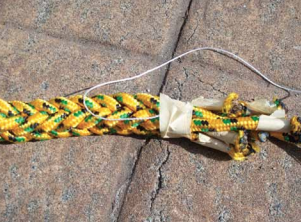
The starting point: One of the best features of the rope is that the loop you create here will be far stronger than any splice.
Three, Two, One… Go!
Think of this project as a grip workout for time. After you’ve picked out your rope, cut it into four equal segments and double them over. A heated blade works great for cutting polypropylene because it seals the ends as you cut. Mark the center of each rope with tape. Tie the center of the strands to a post. If you are using two different colors of rope, arrange the strands so that one color (four strands) is in your right hand and the other color is in your left. Leave enough of a loop at the top so that you could pass a 2-inch pipe through it. This will be the loop you use to attach the finished rope to a joist, eye bolt, pipe, etc. The loop should be big enough to pass the finished rope through.
You’re just about ready to start braiding. Do you have friends? Workout partners? Someone who owes you money? This would be a most excellent time to grab them. The braiding process will go more than twice as fast if one person braids and another person straightens out the loose ends as you go.
Fair warning: If you want to try to braid a 20-foot rope all by yourself and want to be done by Christmas, I’d suggest starting in November. Better yet, reconsider and find someone who owes you a favor. Have some masking tape handy to tape up a half-finished rope if you want to take a break. Look for the tape now, not later.
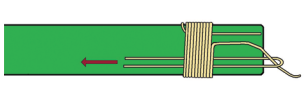
The basic braiding pattern is as follows:
- Line up the strands in columns, one through eight.
- With four strands in your left hand and four in your right, take the outermost strand in your left hand (Strand 1) and move it over five strands then back under two. Move it back to the inside of the strands in your left hand—it is now Strand 4.
- Pick out the outermost strand in your right hand, Strand 8. Move it over five strands and back under two. It should be placed back in your right hand, this time as Strand 5.
- Tighten the braid by pulling your hands apart.
- Repeat steps one through four until you are at the end of your rope—or your wit’s end.
That’s it: Five over, two under. Tighten. Straighten. Repeat.
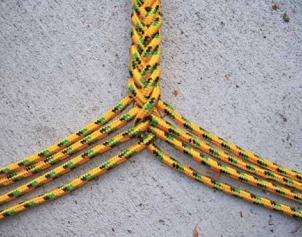
Starting with the outside strand on the left, move the strand over five strands and back under two strands. The strand you moved will now be the innermost of the four on the left. Repeat on the other side.
Don’t overly tighten the braid for the first few rounds or the loop at the top will be too small. As you braid, keep telling yourself, “Outside left: five over, two under. Outside right: five over, two under.” If you have two different colors of rope, one color should always be on the right, the other on the left.

 Lincoln Brigham is a certified strength & conditioning specialist (NSCA) and a U.S.A. Weightlifting certified club coach, and he holds CrossFit Level 2, Gymnastics and Nutrition certifications. Lincoln has been coaching Olympic weightlifting since 2001, competes regularly in masters weightlifting, and has been involved in CrossFit since 2003. At the age of 18 months he climbed to the top of an eight-foot-tall bookcase before being caught.