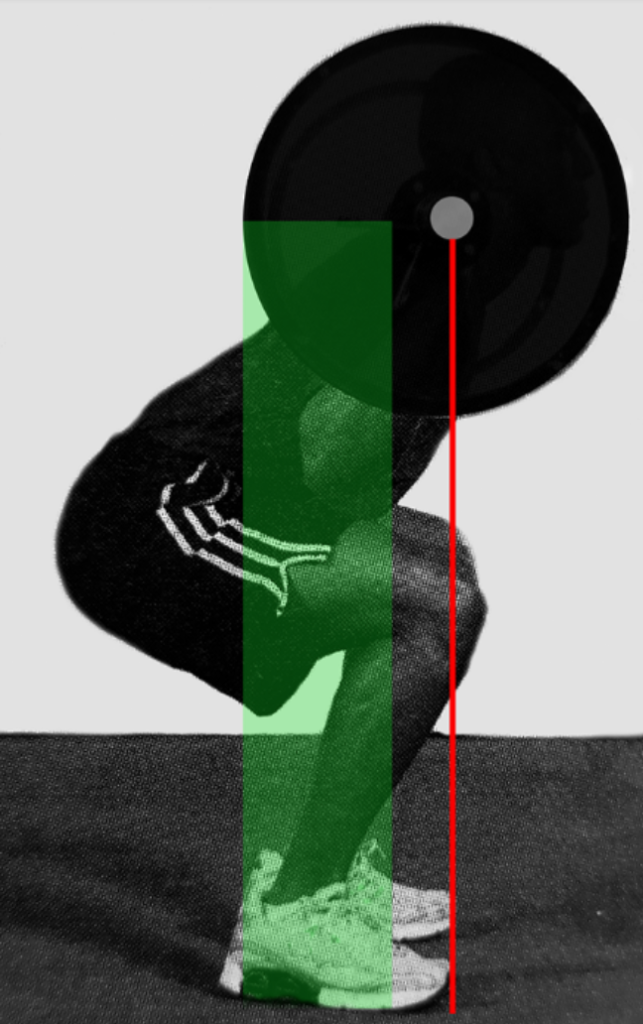
Figure 1: This image from a self-proclaimed authoritative textbook series shows a fake weighted barbell during a back squat. Note that the bar is well in advance of any part of the area of base (green) and thus not replicable when using a loaded barbell. A trainee taught in this manner will have an artificial and inappropriate notion of what the kinetics and kinematics of a squat are, and as such, will require wholesale correction and re-teaching when they first begin using actual weights.
In Part 1, we explored how an effective stance and grip confer certain advantages during a movement, focusing specifically on the two stances most commonly used in CrossFit: a hip-width stance and a shoulder-width stance. In Part 2, we will analyze how to hold an effective stance while moving an external load.
A properly stable and supportive stance during standing and standing exercise is important. Establishing an area of base over which to balance the body is virtually innate in people who have previously learned a specific movement. For example, we learn very early in life to establish a particular foot stance when we stand. A little later we learn how to propel the body across an area of base and create a new one in sequence when we learn to walk. But what we do in the gym is quite frequently a novel position or movement for the trainee, and as such we need to teach foot placement specific to the exercise to be learned – and to any implement used.
Another critical element of understanding the body’s stability and movement efficiency during exercise is that external loads have to be factored into where the center of mass is located. Any consideration of center of mass must include any object supported and moved by the body; it is a system, a combined mass. A 5-foot piece of PVC pipe does not affect center of mass as does a 45-lb bar. Nor does a 45-lb bar affect center of mass as much as 145 lb, and so forth, upward to the limit of human performance. Whatever the weight, the center of the combined mass of the body and implement have to remain over the area of base, preferentially centered over or very close to the exact middle. Coaches must be vigilant when teaching with zero or light loads to ensure the trainee learns to move in the proper sequence while keeping the exercise implement within the area of base. Teaching a movement with an implement out of position relative to where it will be when loaded is not actually teaching the exercise appropriately.
Movement affects the area of base and our interactions with objects. In fact, not all exercise movement is conducted precisely in a vertical line with the center of balance between the ground, the foot, and the load. Further, loads may not be required, by physical law, to be over the area of base (for example, in walking and running, the center of mass is cyclically in front of the area of base). However, stance at the beginning of and during any standing exercise dictates the nature of all subsequent movement and is crucial in teaching and learning. Even in cases of the snatch and the clean where the center of mass is propelled upward as a vector and the entire system breaks contact with the floor before another support phase begins, stance in both phases, pre- and post-contact break, is critical to success.
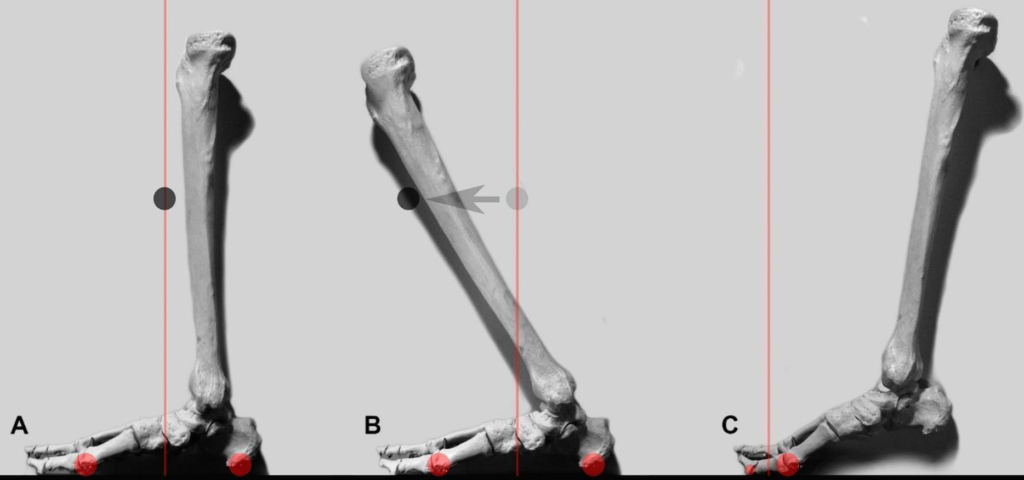
Figure 2: Segmental position variation affects stance and exercise technique kinetics profoundly. (A) A standard-height barbell placed over mid-foot and directly central to the area of base is facilitated by a vertical tibia. (B) If the tibia is angled too far forward, the standard-height bar must be moved forward and can move away from mid-foot and possibly out of the area of base. Both such circumstances will affect any subsequent movement and reduce efficiency in the lifting of the barbell. (C) Raising the heel from the floor, as would occur at the top of a clean pull or snatch pull, pushes the area of base forward. This makes balance more precarious, as it must be achieved in a drastically smaller area. If the combined center of mass occurs behind the vertical line intersecting the area of base, the body and load shift backward. If the combined center of mass occurs in front of the vertical line intersecting the area of base, the body and load move forward.
Foot Placement
Where should the feet actually be placed?
It depends. While that seems like a cop-out, catchall statement, it is globally correct. Stance varies in orientation and dimension between various postures, their purpose, and between differently built individuals. Every exercise has its own specific set of positions that must follow the physical realities required by individual anatomical structure and the nature of the load applied.
As we have seen from the previous images (Part 1, Figure 1) and discussion, the angle of toe point can affect stability, so how do we begin to teach and modify medio-lateral rotation of the foot? We observe our trainee first. Most people will naturally stand with their toes pointed slightly outward. This is a simple function of how the femoral head sits in the acetabulum. Depending on the orientation and depth of the acetabular bowl, the greater trochanter will point laterally and slightly to the posterior to varying degrees. This points the anterior-posterior line of the femoral condyles (of the knee) slightly outward and affects the position of the downstream tibia and foot. When setting the feet for most exercises, we attempt to duplicate the angle of this natural toe point. It is our starting point for many basic exercises, and we will adjust this as required by the nature of other exercise movements.
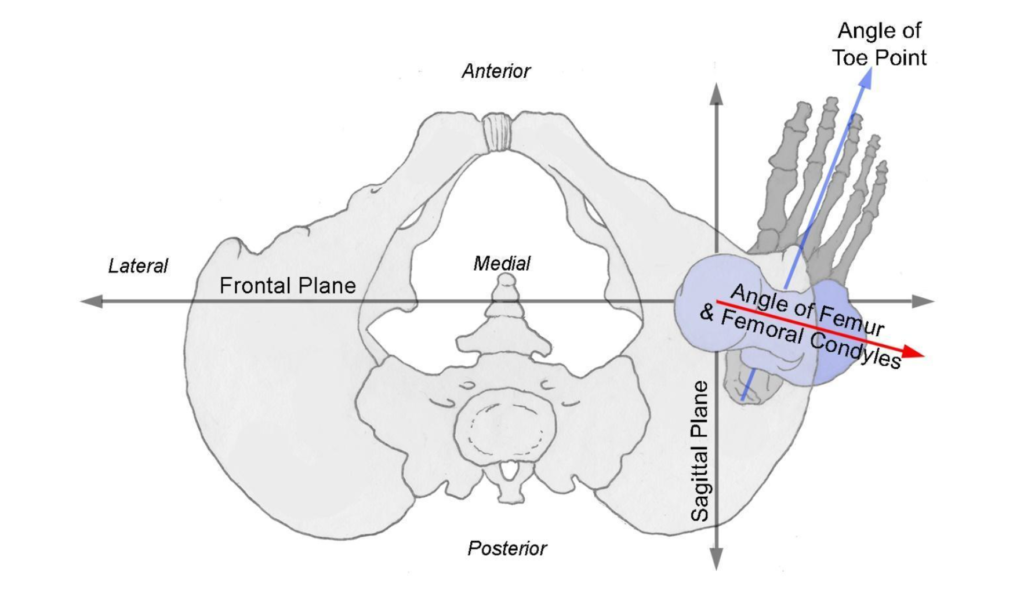
Figure 3: Looking down on the top of the femur, the angle and line of orientation from the hip bones through the femoral head, neck, and greater tuberosity are generally about 10-15 degrees. The angle and line of orientation through the medial and lateral condyles is generally a couple degrees less than at the hip. In relaxed standing, without intentional medial or lateral rotation at the ankle, the line from the heel through the second toe will angle a few degrees laterally. All these angles can vary by several degrees between individuals and even in between legs of the same individual, so observation of the trainee in a relaxed standing position is an important starting point in the data-gathering process before teaching any exercise stance.
We frequently hear “hip width,” “shoulder width,” “narrow stance,” “wide stance,” and many more terms describing the starting stance for various exercises. In most instances, no one bothers to actually understand and use those terms with any accuracy or consistency — they sort of eyeball it and call it good. But we can do much better. We can use easily accessible anatomical landmarks and very precisely get an individual into the correct width of stance. When we do this, we are either optimizing levers, eliminating extraneous levers, or orienting the body to conform to movement demands without anatomical segmental interferences.
In a relaxed standing position, and in some exercises, a narrow stance is common. The most relevant landmarks here are the heels (calcaneus) and the seat bone (ischial tuberosity). In this position, when viewed from the posterior, each heel will line up directly under the central and vertical line through each corresponding butt cheek. This position will also produce the longest displacement of the hip joint from the floor at full extension. Many weightlifters will set their starting stance with their feet at this width, or narrower, in order to facilitate moving the bar as high as possible during the pulling phase of their snatch or clean. Many powerlifters will set their stance far outside wider-than-shoulder-width in order to reduce the height that they must pull the bar.
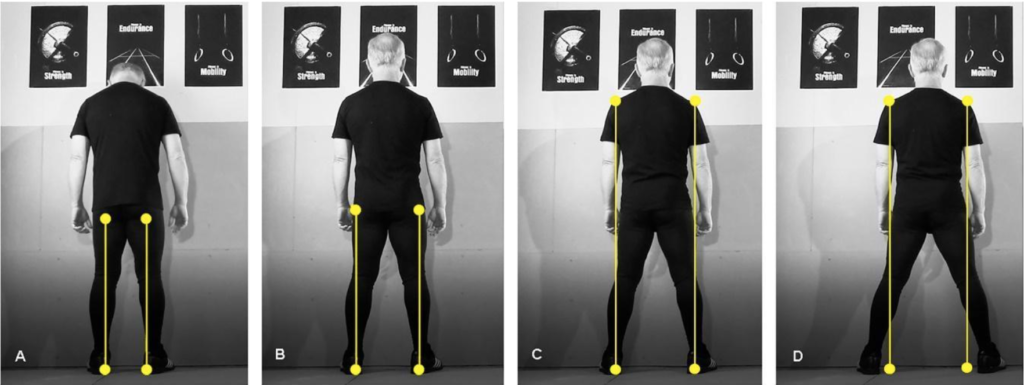
Figure 4: Landmarks of anatomical alignment in the basic stances. (A) In normal relaxed standing, the center of the heels are directly below the ischial tuberosity. (B) In hip-width stance, the center of the heels are directly below the greater trochanter of the proximal femur. (C) In a shoulder-width stance, the center of the heels are directly below the most lateral point of the acromion process of the shoulder skeleton (identify the bone, not the deltoid muscle). (D) For a wider-than-shoulder-width stance, the medial side of the heel is outside of the line of the acromion process to the floor.
Hip width here does not refer to the width at the top of the pelvis, the lateral crests of the right and left ilium, the actual wide points of the hip. The term refers to the position of the femur with its head sitting in the acetabulum. Visually, the most lateral aspect of the heel should line up directly beneath the most lateral point of the greater trochanter of the femur of the same side (this puts center heel under center trochanter). This orientation sets up a stable stance with the skeleton in a vertical alignment favoring efficient force transfer along the longitudinal axis. This stance reduces inclusion of extraneous lever inefficiencies that require added and extraneous muscular effort to maintain balance. It is the most energy-efficient stance. Pulling from the floor, as in the snatch or clean, and the drive phase of the push press, push jerk, or jerk lend themselves well to this alignment. The use of this stance during deadlifting specifically allows placement of the arms, unimpeded, immediately beside the legs in a nearly vertical line to the bar, as seen from the anterior or posterior. This puts the shoulders at maximal distance from the bar (results in a more open hip and shorter range-of-motion pull) and prevents inclusion of extraneous lever inefficiencies among other benefits.
Shoulder width describes a foot position with the heel aligned under the point of the acromion process, the most lateral aspect of the joint where the scapular spine, clavicle, and head of the humerus come into close proximity. It is preferable to palpate the anatomical feature for accuracy, however a shortcut is to visually align the lateral border of each heel to be directly under the most lateral external border of the deltoid of each respective side. This is a staple position for any exercise requiring full-range-of-motion squatting. With the stance at this width, the lower pelvis can drop, unrestricted, between the right and left tibias and ankles. With narrower stances, the hips will be prevented from reaching full range of motion when they are interfered with by the muscles along the posterior femurs and tibias contacting each other.
For standing exercises where the legs do not move, any of the stance widths can work, but preference should be given to the hip- and shoulder-width stances that increase body stability and balance with minimal addition of non-useful lever arms.
For exercises where the highest elevation of the hips and torso is required, the normal relaxed stance works as it creates the greatest maximal distance between the floor and hip.
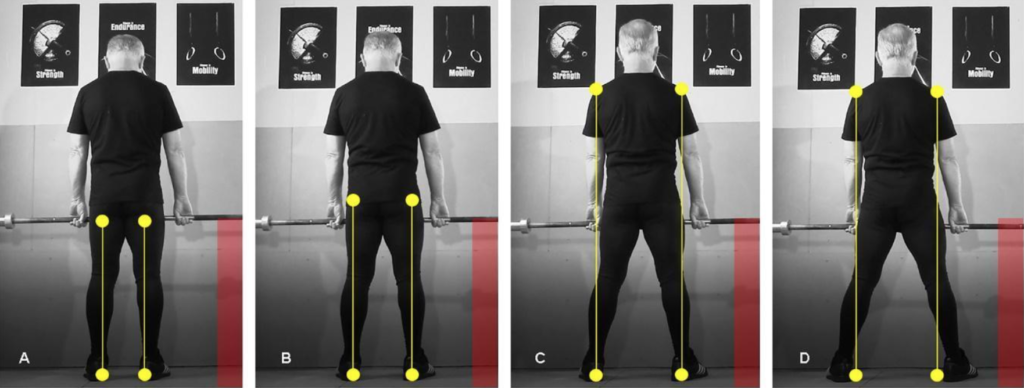
Figure 5: As the stance is widened the distance from the bar to the floor is shortened. The variance in bar height between relaxed standing foot stance (A), hip-width stance (B), and shoulder-width stance (C) is minimal, amounting to approximately the diameter of the bar. However, as the stance is widened outside of shoulder width (D), the bar height from the floor diminishes rapidly as the feet are spread.
For exercises where an object, such as a barbell on the floor, requires a grip outside the legs, the normal relaxed stance or hip-width stance can work. Shoulder-width and wider-than-shoulder-width stances are generally untenable in that context. In a shoulder-width stance, the legs will physically push the elbows out and induce a technical flaw, pulling with bent elbows, thus introducing an undesired lever and force-dampening outcome. To counter this effect in some exercises, it is common to medially rotate the feet inward, where the toes point directly forward rather than slightly out. This adjustment moves the line of the hip so the knees point directly forward during movement and minimizes the interference of the legs with elbow position.
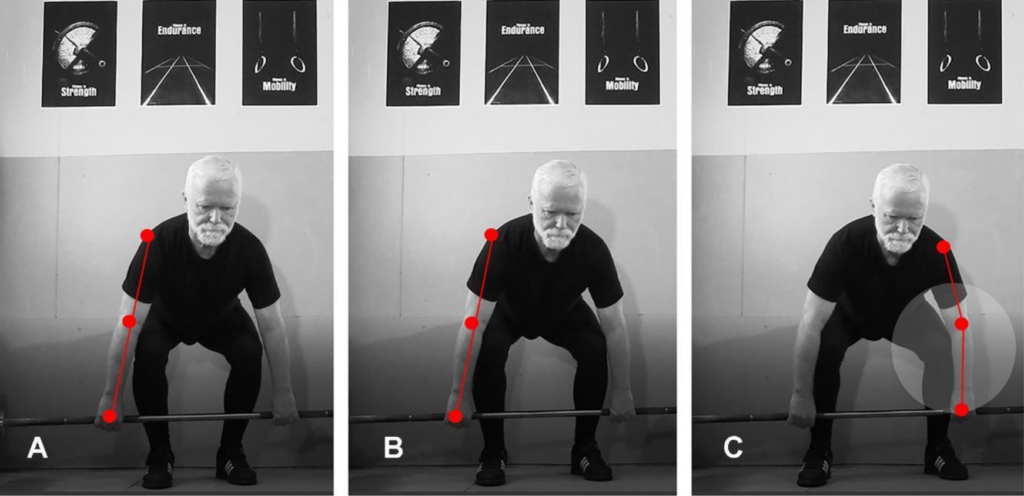
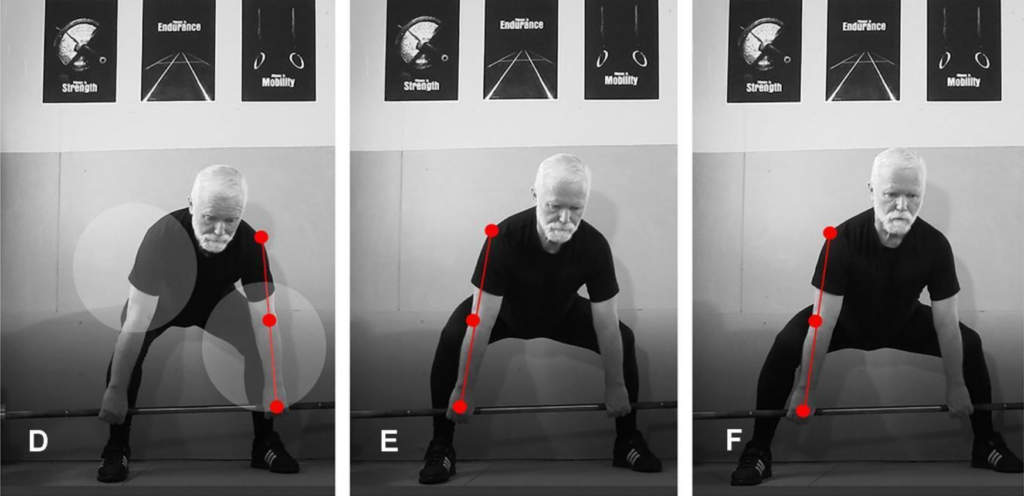
Figure 6: The placement of the feet can cause undesired interactions of the legs with the arms. Relaxed standing and hip-width stances allow the knees to pass between the arms (A, B). At a hip-width stance, the knees impinge on the forearms and push and bend the elbows out (C). At a shoulder-width stance the knees are behind the arms and interfere with hip and shoulder position (D). Wider-than-shoulder-width stances (E, F) allow the arms to pass between the legs.
The most common application of the shoulder-width stance is setting the stance in squatting. By having the heels under the shoulders, the hips can drop low, between the calves and ankles without hindrance from the thighs and calves meeting too soon. This stance also enables a comparatively long range of motion from full stand to bottom position. A just-wider-than-shoulder-width stance offers similar benefits. Using a hip-width stance or narrower places the hips over the heels and causes the posterior musculature of the thighs and calves to impede squatting to depth. Very wide stances reduce range of motion, may be less comfortable for the trainee at the bottom, and introduce undesired levers that reduce efficiency. There are a few anthropometric variances that can allow for narrower or wider stances, but the shoulder-width stance is the starting point from which observations and individual adjustments are made.
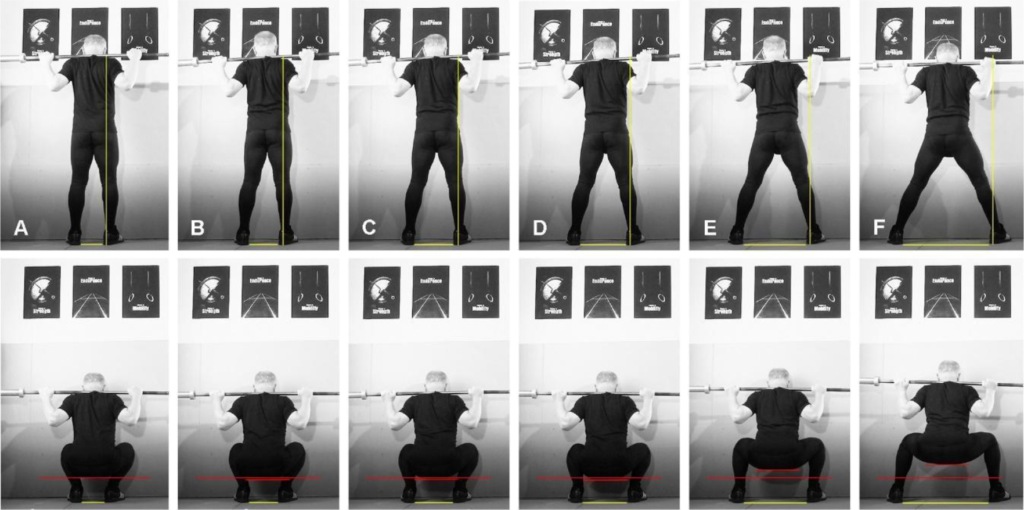
Figure 7: Stance width significantly affects squat range-of-motion distance. Squatting in a relaxed standing position (A) leads the back of the thighs and calves to come into contact and stop knee flexion leading to a shallower bottom position. As stance width moves outward from hip width (B) to just outside shoulder width (D), the hips move with less contact interference and greater depths at the bottom position result. As stance width widens further away from the shoulder to much wider than shoulder width (E and F), the depth of squat range of motion begins to shorten. Note that all of these squats are “legal” full-range-of-motion squats as the inguinal fold (hip crease) is below the top of the patella at the bottom in all instances. Longer range-of-motion distances (B,C,D) provide the best development over a larger set of joint angles and are preferable for general purposes. A shorter range of motion can provide moderate advantages in moving larger weights, an important consideration in strength sports. Trainers need to know when and why they want maximum-distance range of motion or minimum-distance range of motion.
Wider-than-shoulder-width stances are generally dictated in everyday life by the dimensions of the object moved. For example, if we are lifting a box, a kid, or a stone from the floor, we set our stance wide enough to place the load between our legs in the center of our area of base. We also set the stance wide enough to get our arms around the load and between the thighs, or as close to the center of the area of base as possible. A wide stance in other exercise systems such as Yoga is selected if the posture to be assumed has postural target positions that require the torso and arms to be in between the legs, such as the Wide-Leg Forward Fold (Prasarita Padottanasana).
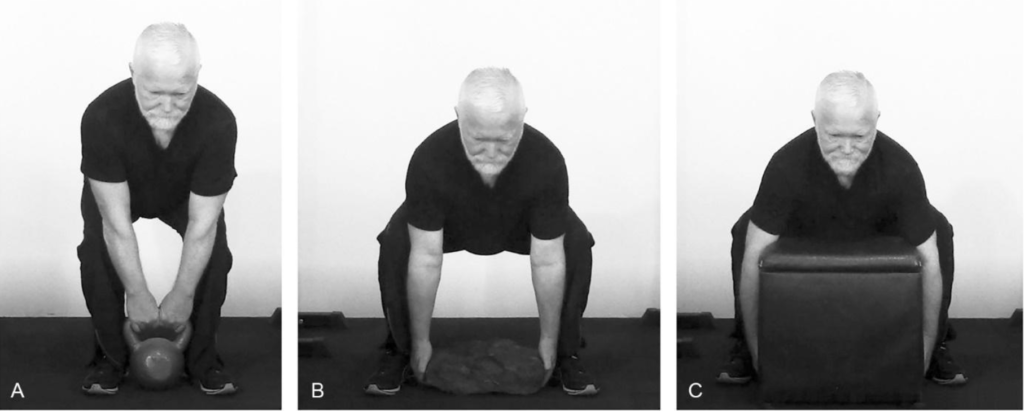
Figure 8: Similar mass but different shape objects – (A) kettlebell, (B) stone, (C) storage box – utilize varied stance widths in order to lift the object from the floor and maintain it within the area of base.
Selection of how wide a stance is can be self-selected by a trainee. If you are coaching a new trainee and you let them self-select stance and they correctly assume a stance, great, move on with the next step of your teaching plan. But it is imperative to correct them if their stance is incorrect. In antiquated versions of Yoga teaching, self-exploration of the specific position assumed in a posture was the norm. Endless trainee hours in a posture thinking about the posture with virtually no feedback was considered the most appropriate method of teaching. With enough time, including lots of wasted time, this approach can be viable, as “feeling” the physics of any posture or movement and responding to them is an innate strategy that generally is self-learned during early human development — but not always. An entire academic discipline (ergonomics) has grown up around people who don’t apply intuitive and simple anatomical and physical principles to moving their bodies at home, at work, and at play. In the modern gym or studio, we teach proper stance positions overtly because; (1) exercises, movements, and stances are frequently unfamiliar to the general public and as such, coaching people into correct positions is time efficient and shortens the learning curve, (2) assuming postures as close as possible to the idealized position is key to producing the results desired by both the trainee and the teacher, and (3) we want the trainee to be as successful as possible as quickly as possible and as safely as possible. If we are teaching fitness professionally, this is what the client is paying for: the best possible learning circumstances that deliver objective, tangible, and achievable results rapidly.