In this Article:
- Snatch Fundamentals: Stance, Grip
- The Burgener Warm-up for the Snatch
- The Skill Transfer Exercises for the Snatch
- The Three Pulls of the Snatch
- Common Errors for the Snatch
The snatch, the queen of the Olympic lifts, is performed by lifting the barbell from the ground to overhead in one smooth motion. With an average time of 1.5 seconds to complete the lift, the snatch is widely considered the fastest and most powerful lift in the world — it’s also the most technical and requires skill, precision, and requisite strength.
Similar to the clean, the lifter performs three phases, or pulls, when performing the snatch. The first pull from the ground is a smooth positioning pull using the legs to lift the bar just past the knees. Once the bar passes the knees, the lifter performs the second pull by aggressively “jumping” their body into the finish position with hips and legs fully extended. This rapid extension of the hips and legs creates speed and upward momentum on the bar. At this point, with the bar momentarily “weightless,” the final phase of the lift, or third pull, sees the lifter actively pulling their body down, around and under the bar, while aggressively punching the barbell overhead.
There are a few subtle differences in the first and second pulls of the snatch and clean, but the objectives remain the same. The key differences between the lift can be seen in the third pull and receiving position. Instead of receiving the barbell on the shoulders, the lifter must receive the barbell in an overhead squat, therefore requiring the bar to travel much farther.
The speed, force, and distance the athlete must lift the bar during the snatch make it a potent movement with enormous fitness potential due to the high power output. There are a few variations of the snatch, which can be performed at light loads by beginners, as well as extremely heavy loads by experienced weightlifters.
As the old saying goes, “Simple, but not easy”… even the best Olympic lifters drill the elements of the snatch with light weight.
By nature, the snatch is a complex movement that requires technical efficiency. Fortunately, we can break this lift down and develop proper technique by working fundamentals, drills, positions, and pulls.
SNATCH FUNDAMENTALS: STANCE, GRIP, POSITION
STANCE
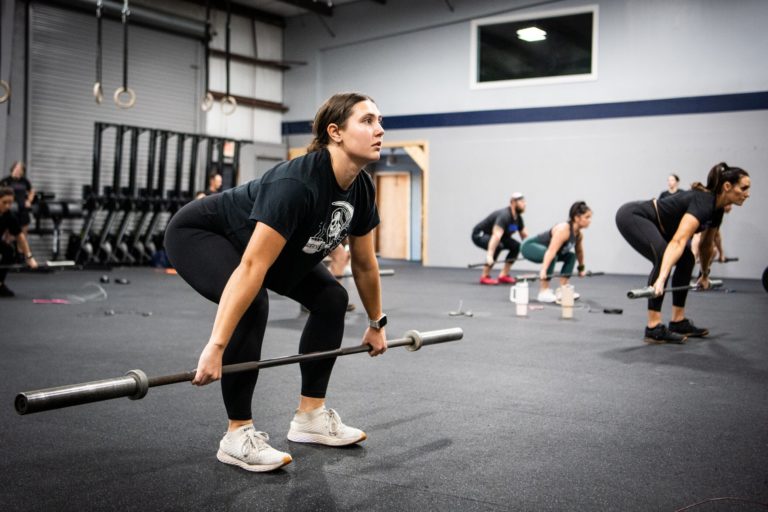 The jumping position is the stance assumed when initiating the snatch. The feet should be placed under the hips, similar to the stance the athlete would assume prior to doing a vertical jump (Note: Stance is critical as the majority of all missed lifts can be attributed to improper footwork.). Ultimately, a proper jumping position is a stance the lifter can generate power from in order to be explosive while lifting. To find your jumping position, jump up and down a few times and take note of where your feet naturally go. Start to jump a bit higher each rep and you’ll see the body will adjust and naturally find a powerful jumping position.
The landing position is the stance assumed when receiving a snatch and is identical to the footwork for the overhead squat. The key component to a proper receiving/squat position is stability, so it’s up to the athlete to find a position where they can comfortably support a heavy weight overhead. Ideally, the feet should be shoulder-width apart with the toes slightly turned out, the knees tracking over the toes, and the weight evenly distributed and balanced across the feet. We advocate a fast and aggressive jump/shift of the feet from a jumping position to a landing position to train speed and stability.
Points of performance:
1. Feet shoulder-width apart.
2. Toes turned out slightly.
3. Knees tracking over the toes.
4. Torso is vertical/upright.
5. Weight is balanced and evenly distributed in the feet.
GRIP
When performing any version of the snatch, we use the hook grip. A hook grip is a secure grip where you wrap your thumb around the bar and the fingers around the thumb. It takes a weak link in the grip and turns it into a strength by using the thumb as a strap. As you create speed through the middle, a hook grip will ensure the barbell doesn’t move or slip in the hands resulting in a loss of energy. But it’s not a death grip. Gripping too hard will slow the bar down and lead to pulling with the arms. Although it’s not required, to increase the speed of the turnover, we recommend flipping the thumbs out during the turnover of the hands as the bar is received overhead.
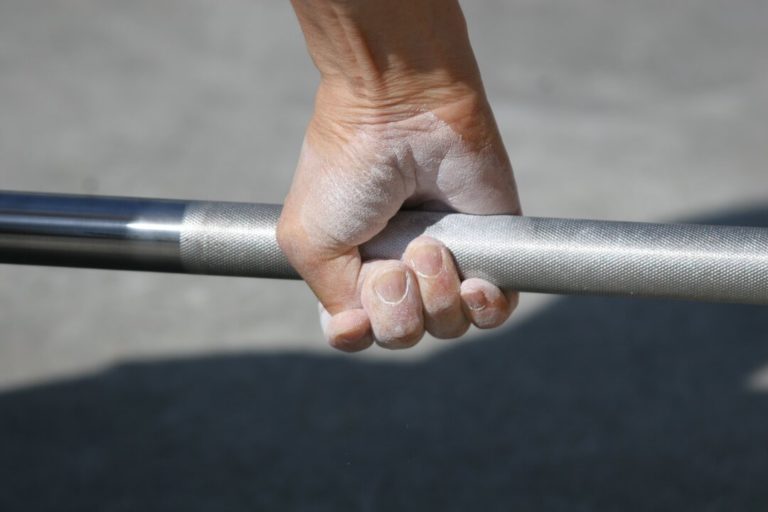
Hook grip
Points of performance:
1. Thumbs wrap around the bar.
2. Fingers grab the thumbs.
3. Knuckles down at high hang.
The width of the grip is based on an athlete’s body structure and proportions. The overall goal is to find a width that allows for an aggressive turnover while being stable overhead. Ideally, the barbell should be 6-12 inches above the head when overhead. For beginners or athletes suffering from wrist pain, err on the side of a narrower grip to remain pain-free and build strength overhead. Below are three efficient and effective ways to find an individual’s grip width:
a. Hip-crease method: In the jumping position, flex your hips, push the butt back, and place a PVC horizontally into the hip crease. Slide your right hand out, then your left hand out until both arms straighten, point your knuckles down, and stand up. Ideally, the PVC will stay in the hip crease with the chest up, shoulders back, and arms relaxed. If the PVC rises above the hip crease, the hands are too wide.
b. Pass-through: Hold a PVC in front of your body with hands wide enough so the PVC rests at the crease of the hips. With elbows straight, glutes squeezed, and ribs down, rotate the PVC overhead and behind you, until it makes contact with the lower back, then reverse directions and bring the bar back in front of the body along the same path. If you are unable to complete the full arc back and forth, widen the hands a little.
c. Eyeball method: The eyeball method is an efficient way to reconfirm the grip width after performing the hip-crease method. Just like the name states, the coach will scan the group “eyeballing” each lifter’s grip to ensure the barbell is 6-12 inches overhead.
Points of performance:
1. Bar is 6-12 inches/15-30 centimeters overhead.
2. Hands evenly spaced on the barbell.
3. When overhead, the wrists should be neutral to slightly back and the palms turned up.
RECEIVING POSITION
 To safely support heavy weights overhead, it’s important the lifter receives the bar with active shoulders. Ideally, we’re looking for external rotation with internal torque (think armpits forward), which places the shoulders in a stable position when loaded overhead. “Stacking the bones,” while having a vertical torso, helps keep the barbell within the area of the base allowing the lifter to support the weight with both the muscular and skeletal systems.
Points of performance:
1. Active shoulders = External rotation + internal torque.
2. Armpits are forward and the crease of the elbow points up.
3. Bar is stacked over the shoulders, hips, and area of the base.
4. Upright torso.
5. Weight is balanced and feet are in a stable receiving position.
THE BURGENER WARM-UP FOR THE SNATCH
The Burgener Warm-up is a series of five drills that take the complex movement of the snatch, and break it down into efficient and effective movements to dial in technical proficiency. Each drill is done with a specific purpose so the individual movements can be used as drills to fix errors that arise during a lift. As you go through these drills, remember to always check stance, grip, and position. Lastly, when learning the Burgener Warm-up, we recommend sticking with a PVC pipe. However, once an athlete has mastered the PVC, feel free to perform the warm-up with an empty barbell.
1-2-3: Down and finish = “Speed through the middle.”
4-5-6: Elbows high and outside = “Bar close.”
7-8-9: Muscle snatch = “Strong turnover.”
10-11-12: Power snatch lands = “Footwork.”
13-14-15: Snatch lands = “Footwork.”
THE SKILL TRANSFER EXERCISES FOR THE SNATCH
The second set of drills for the snatch is the Skill Transfer Exercises. Similar to the Burgener Warm-up, not only do these movements help dial in technical efficiency, but in the future, they become our go-to assistance and accessory exercises for the snatch. Four out of the five movements can be done with 100%+ of the athlete’s 1-rep-max snatch so we utilize these movements to help strengthen positions, as well as build confidence.
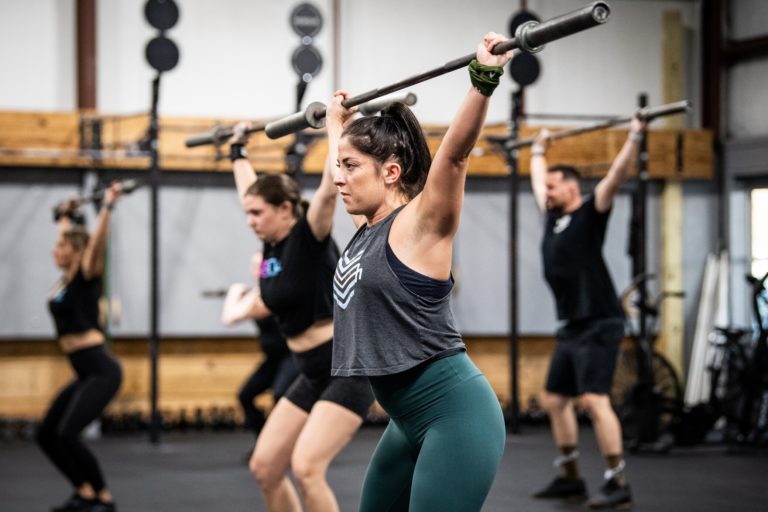
1-2-3: Snatch push press = “Overhead strength.”
4-5-6: Overhead squat = “Core strength.”
7-8-9: Heaving snatch balance = “Arm speed.”
10-11-12: Drop snatch = “Foot and arm speed.”
13-14-15: Snatch balance = “Foot and arm speed.”
HOW TO PROGRESS THE BURGENER WARM-UP AND SKILL TRANSFER EXERCISES
Set 1: Perform pause and/or tempo, dialing in the points of performance. For example, during the down and finish, pause in the down before exploding into a finish. Or for the muscle snatch, pause in the down, finish, elbows high and outside, turnover, and punch overhead.
Set 2: Perform the drill at full speed with no verbal command.
Set 3: Perform the drill at full speed with verbal command (purpose).
SNATCH POSITIONS: HIGH HANG, HANG, START POSITIONS
When learning to snatch, we recommend starting from the top (high-hang position) and working our way to the floor (start position), as it will set you up for success by simplifying the snatch into a shorter range of motion. Most people can snatch from the high hang, so to keep it simple, it’s the first position we teach to dial in technical efficiency and confidence before moving to the mid-thigh/low hang. If problems start to occur, come back to the high hang, perform 3-5 reps of a down and finish, then snatch. Remember: Mechanics → consistency → intensity.
THE HIGH-HANG SNATCH
A high-hang snatch is performed by doing a down + finish and receiving the barbell in an overhead squat. The main emphasis is on creating speed and elevation on the bar with aggressive leg drive and vertical hip extension into the finish position while keeping the bar close. When snatching from the high hang, the lifter doesn’t have to worry about the first pull so it allows them to simplify their focus to an aggressive finish, a strong turnover, and a solid receiving position.
THE HANG SNATCH
The hang snatch (launch position) is performed with the bar starting just above the knees. As the bar passes the knees, the first pull ends and the second pull begins. To create a powerful finish, the hang position engages the hamstrings and gets the stretch reflex response that occurs when a person jumps. The key is to stay balanced. It’s important to understand that the bar will attempt to pull the lifter forward throughout the lift; therefore, the lifter can use the distribution of their weight to counteract that force and create a combined center of gravity (COG) between the body and the barbell. Learn to stay over the barbell and use the legs — not the back — to reach the hang position.
Points of performance:
1. Weight is balanced and slightly back on the heels, creating a combined COG between the body and the barbell.
2. Knees are slightly bent.
3. Hamstrings and posterior chain are loaded.
4. Lower back is arched and the upper back is set.
5. Shoulders are over the bar and the lats are engaged.
THE START POSITION
The start position and setup are two of the most widely individualized positions, but the key points of performance remain the same for both the snatch and the clean. The lifter needs to find a start position that allows them to lift with their legs off the floor, maintain balance throughout the first pull, and perform a smooth transition into an aggressive, explosive second pull.
Points of performance:
1. Weight is distributed mid-foot and balanced.
2. Hips in line with the knees, +/- a few centimeters.
3. Lower back is arched and the posterior chain is set.
4. Shoulders are slightly in front of the barbell.
5. Head is neutral with eyes focused forward.
THE THREE PULLS OF THE SNATCH
THE FIRST PULL
The first pull is a positioning pull and a pull of force in which the lifter initiates movement by driving through the floor, shifting the knees back, and standing with the legs. The purpose of the first pull is to create the optimal launch position with balance, speed, and timing so the lifter can perform a powerful second pull. Biomechanically, it’s a priming phase in which kinetic energy is created as the barbell is accelerated until it reaches knee level. The speed of the first pull varies from lifter to lifter but a general rule of thumb is that the speed of the second pull must be faster than the first. Remember, “slow is smooth, smooth is fast.”
Points of performance:
1. Weight shifts back as necessary to maintain balance and control of the weight.
2. Knees shift back to near full extension.
3. Hips rise at the same rate as bar and shoulders.
4. Shoulders stay over the barbell and rise at the same rate as the bar — minimal change in back angle.
5. Bar path: Sweeps back into the lifter.
SECOND PULL
The second pull is the first transition phase and starts as the barbell passes the knees. This primary energy phase creates a large amount of mechanical energy through the “double knee bend” as the spinal erectors, glutes, and hip adductors contract to rotate the torso over a large angle around the hips. The forward motion (rebend) of the knees helps the lifter stay balanced and support the vertical forces of the finish position, in addition to allowing a controlled “brush” of the hips on the bar, rather than a “bang.” As the bar and body make contact, the athlete pushes/drives/jumps, using their legs, elevating and guiding the barbell in a vertical motion. The key is to combine aggressive hip extension and violent leg drive to generate maximal vertical displacement, with minimal horizontal displacement.
Points of performance:
1. Balanced, flat-footed as long as possible, then drive off the balls of the feet.
2. Knees rebend, then extend.
3. Hips rotate (scoop) toward the bar and under the shoulders, then extend vertically.
4. Shoulders, torso, and chest move from horizontal to vertical and finish behind the bar.
5. Bar stays close to the body and makes contact in the hip crease while creating maximal vertical displacement with minimal horizontal displacement.
THIRD PULL
 The third pull (aka pull under, turnover) is when the barbell leaves the hip and is received overhead. Due to the rapid, direct kinetic energy transfer that takes place when the barbell makes contact with the hip/upper thigh, the success of the pull is often dictated by the positions and pulls that precede it. With that said, the turnover must be an active movement that begins at maximum knee extension and ends when the barbell is received. As the barbell is moving vertically (“speed through the middle”), the lifter continues to pull on the bar, getting the elbows high and outside (“keep the bar close”), jumps/shifts their feet out into a squat stance, while repositioning their body down and around the bar in order to punch their body into a stable, strong, and controlled receiving position.
Points of performance:
1. Elbows high and outside and continuing to pull.
2. Bar stays within the area of the base.
3. Feet shift out to receiving position.
4. Aggressive turnover and punch under the bar.
5. Strong and stable receiving position.
Common Errors for the Snatch
1: Common Error – First Pull
Fault: Forward bar path off the floor.
Common Causes:
- Weight in heels in start position.
- Athlete does not shift weight back to heels to maintain balance.
- Athlete shoots hips up/rushes first pull.
Explanation:
The cause of the problem will dictate the correction, but remember to always check the fundamentals: stance, grip, position. If the athlete has an improper start position and their weight is distributed on their heels, simply cue them to shift the weight forward.
A common mistake when giving this cue is that the athlete will shift the weight forward by raising their hips. If this occurs, apply hands-on tactile cueing, and place them in a position where their hips and knees are almost in line. We want the weight to be in the mid-foot and slightly forward in the start position because it allows the athlete to produce force throughout the first pull.
On the flip side, if the error is a matter of rushing the barbell off the ground, have them slow down the first pull and/or pause at the launch position before continuing the lift.
Corrective Drills:
1: Pause pulls: A snatch pull that includes one or more pauses at designated positions for a prescribed time before exploding in a finish. Common pause positions are 1-inch off floor, below knee, launch, mid-thigh, and down.
- Programming: 2-5 reps per set with 2-3-second pause @ 70%-110% 1-rep-max snatch
2: Banded tempo deadlifts: A snatch deadlift with a band attached to the bar for resistance. Tempo can be performed both on the way up and the way down, and resistance can be applied horizontally or vertically.
- Programming: 2-5 reps per set with 2-3 second pause @ 70%-110% 1-rep-max snatch. These can also be done with an empty bar or very light weight as a technique primer.
3: Pause snatches: A snatch with one or more pauses during the pull before completing the snatch. Common pause positions are 1-inch off floor, below knee, launch, mid-thigh, and down and receive.
- Programming: 1-2 reps with 2-3 second pause @ 70%-100% 1-rep-max snatch.
2: Common Error – First Pull
Fault: Athlete going around his/her knees.
Common Causes:
- Rushing the first pull/gripping and ripping.
- Not staying patient over the bar.
- Lack of sufficient leg drive/pushing through the floor.
Explanation:
The launch position is one of the most important positions in the snatch so when it’s missed, our bodies are at a disadvantage when transitioning into the second pull. There are many styles of pulling from the floor to the launch position but when you fail to load the hamstrings in the launch, remind yourself to shift the knees back and extend the knees as you pull the bar off the ground. The barbell and the back should rise at similar rates. Remember, “slow is smooth, smooth is fast.”
Corrective Drills:
Use the same corrective drills from Common Error 1 to fix the first pull.
3: Common Error – Second Pull
Fault: Unbalanced launch position where toes are floating off the ground.
Common Causes:
- Shifting weight too far back during the first pull.
- Starting with weight on heels in the start position.
Explanation:
Maintaining balance in the launch position is a key point of performance and one of the biggest errors we see in the snatch. We understand the bar wants to pull the lifter forward throughout the lift so an athlete might try to overcompensate by shifting their weight back too far on the heels during the first pull. If the toes are coming off the ground and the lifter isn’t flat-footed in the launch position, as they go to drive into the finish, oftentimes they “rock” too far forward. Now all the weight is on their toes.
Effective cues to give yourself are, “drive through your heels,” “stay flat-footed,” and “grip the floor with your toes.” Over time and with more experience, you’ll learn how much you actually need to shift back at each weight to maintain balance.
Corrective Drills:
1: Pause snatches: A snatch with one or more pauses during the pull before completing the snatch. Common pause positions are 1-inch off floor, below knee, launch, mid-thigh, and down.
- Programming: 1-2 reps with a 2-3-second pause @ 70%-100% 1-rep-max snatch.
2: Snatch lift off: A snatch deadlift up to the launch position without a pause. This drill is meant to practice proper position and shifting of weight to maintain balance through the movement.
- Programming: 2-5 reps @ 70%-100% 1-rep-max snatch.
4: Common Error – Second Pull
Fault: Swinging the barbell outside the area of base (AOB).
Common Causes:
- Excessive horizontal hip extension.
- Straight, stiff arms.
- Weight on toes in launch.
Explanation: Swinging the barbell outside the area of the base will cause very inconsistent lifting. The majority of the time, we see athletes “banging” their hips into the bar and then losing control overhead. Without a doubt, there’s an aggressive contact that happens with the bar and our body, as it allows a transfer of energy from our body to the bar. But we like to think of it more as a brush, rather than a bang. The contact should happen naturally and in a vertical motion. We like to say, “hips up, bar up; hips out, bar out.” So using cues such as, “vertical hips,” “keep the bar close,” elbows high and outside” are all great verbal options.
An effective tactile cue is to place a PVC pipe at the end range of the AOB and then have the athlete lift.
Corrective Drills:
1: 3-position snatch: 3 snatches performed from three different positions consecutively. They can be performed starting from the ground and working your way up to the hang, or start at the hang and perform your third rep from the floor. Starting with your first rep from the floor will allow you to focus on having an overly aggressive finish in the final hang snatch due to being fatigued from the previous reps. If you’re struggling with the first pull, snatch from the hang first so you can get the benefit of a snatch liftoff during the set.
- Programming: 3 reps @ 60-80% 1-rep-max snatch.
2: Snatch pulls: Starting from the floor, aggressively drive your body into the finish position, keeping the bar close to the body, making contact at the hips, and directing the movement vertically. The body will reach full extension in the ankles, knees, and hips while having the shoulders behind the bar. The arms are like ropes, not two-by-fours, and remain relaxed in the extension.
- Programming: 2-5 reps @ 80%110% 1-rep-max snatch.
3: Snatch high pull + snatch: A combination movement that reinforces keeping the bar close before performing a full snatch. Perform a snatch high pull from the ground, focusing on getting the elbows high and outside, then return the bar to the floor and complete a snatch.
- Programming: 1-3 reps @ 70-90% 1-rep-max snatch.
To learn more about the snatch and other Olympic weightlifting movements like the clean and jerk, seek out a local CrossFit gym and work with a credentialed coach.
What Is a Snatch?